spreader bar install in 15 min ?

7t9l82

Well-known member
Joined
Aug 26, 2013
Messages
364
Location
melbourne,florida
i read that speed direct claims that the spreader bar they sell can be installed in 15 min, bullcrap! maybe if the radiator , shroud and engine are out of the car and you use air tools. otherwise i call:bs:.aint no way. it took an hour on the drivers side and thats pulling the alternator. looks like the passenger side the a/c compressor needs to come out too, so i guess when i change the a/c compressor i will do the other side. speed direct makes a nice product but if they think its a 15 min job they can:kissass:
 
I built my own brackets and my spreader bar can be installed and removed easy .... no A/C compressor though....

After a few disappointments with this mass produced junk most vendors sell I do more and more my own work.... and least then I know who to blame when the stuff doesn't fit or doesn't work.... :clap:
 
Their design is junk with the bolts going in from front to back. I built a couple from scratch and always made them so the bolts go in vertically and the lower part has threads so you don't have to hold a nut with a wrench
The brackets are the most labour intensive to install but once it's all in, the bar itself can be removed in a matter of minutes.
24937fecabae74.jpg
 
thats a better way to do the bar for sure. i guess i don't understand why the brackets couldn't go over the control arm bolts and then have locknuts on the bracket . if the alignment guy needs to add or remove shims loosen all the bolts. i hear the bar makes a difference , i just hope it does.
 
I'm with Karsten - this is DIY! You can buy the shaft and rod ends, bolts and 2 each Chassis Tabs/Shock Absorber mounts and tie the forward ends of the cross member to the upper Control Arm.
thum_1269525dbe917ced5.jpg
Yes 15 minutes or less - except for the Brown Truck wait time!
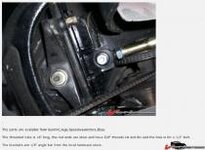
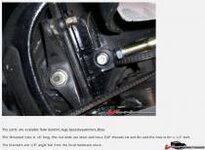
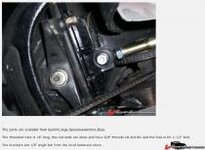
This one may be Karsten's (a few notes added from his psting no doubt):
thum_1269525dbf32ad5fc.jpg
Cheers - Jim
 
your idea of using jam nuts is a good one and would make the job easier. oh well i already bought the stupid thing and it half way done. does the bar really help?
 
This one may be Karsten's (a few notes added from his psting no doubt):
thum_1269525dbf32ad5fc.jpg
Cheers - Jim

Yes, that's the bar I made a few years ago... Maybe I should make a few extra brackets while I got the welder out :lol:

The bar makes a difference, don't overtighten it.....
 
This one may be Karsten's (a few notes added from his psting no doubt):
thum_1269525dbf32ad5fc.jpg
Cheers - Jim

Yes, that's the bar I made a few years ago... Maybe I should make a few extra brackets while I got the welder out :lol:

The bar makes a difference, don't overtighten it.....

When having the car aligned, I noticed the bar was tight as hell in there, compared to just snug, the way I had it ....so how to know how much, and what is the affect IF the thing is in fact over tight....???
 
The frame flexes to some degree - I tightened mine a little more than "snug", without a wrench though, just by hand when the wheels were on the ground. If you put a jack under the front crossmember and lift the car, the frame will flex and there will be tension on the bar, let the car back down and get the weight on the suspension there will be more compression on the bar.... if you tighten the bar while on jacks you might prevent the frame from flexing "inwards" when you let it off the jacks and so put too much compression on the bar...
Just for grins, measure the dimension between the two upper cross shafts when on the ground, repeat when on a jack supported under the crossmember, might not be much difference but there will be some.....
 
so, i tighten it sitting on the ground?
i got the passenger side bracket mounted and after i cut a small hole in the side of the shroud for a deep well socket and removed the a/c belt i got it on
fairly easy. but then , the bar is about an inch too long!!:hunter: do these people at speed direct even measure this stuff? come on people i know there is some differences in frames but over an inch ? now to make this thing look right i need to cut a 1/2 inch off either end in a lathe! you guys that made your own are on the right track . I'm glad i held off on the sharkbite suspension they say that takes 4 hours!! and they said this is a 15 min job!:club:

Yes, tighten it with the weight on the suspension (wheels on ground), just a tad more than "snug".... see how it "feels" driving it, you can always tighten some more after a first test drive.

Sharkbite suspension ??? To each his own but I don't think it does anything more than look fancy.... great stuff if you add a few LEDs under the rear bumper :clap::clap:

Nah, seriously, the dual mount rear fiberglass spring is much cheaper and a huge performance upgrade and a lot less weight than the 40lbs stock spring....
 
i think i will put the 360 pound rear spring in that i have had on the shelf for a few years and then put the 550 pound springs on the front with bilsteins all around and call it done.
 
i think i will put the 360 pound rear spring in that i have had on the shelf for a few years and then put the 550 pound springs on the front with bilsteins all around and call it done.

I have the 550# coils up front, they're great. I probably buy the dual mount front fiberglass spring some time in the not too distant future - I could give you a good deal on the 550# coils :D
 
i think i will put the 360 pound rear spring in that i have had on the shelf for a few years and then put the 550 pound springs on the front with bilsteins all around and call it done.

VBP 460 springs in front, and that's what I did many years ago....my spring is a single center mount....

HUGE improvement....
 
i think i will put the 360 pound rear spring in that i have had on the shelf for a few years and then put the 550 pound springs on the front with bilsteins all around and call it done.

I have the 550# coils up front, they're great. I probably buy the dual mount front fiberglass spring some time in the not too distant future - I could give you a good deal on the 550# coils :D

that might work out, the nice thing about a used spring is it has probably set already . I'm thinking of cutting a 1/2 coil to lower it a tad more too. let me know. what part of Florida are you in?
 
THE BAR IS OPEN! er ah i mean installed. all in all it was a pain and not one of ideas i planned out in advance worked out. but persistence and the firm belief that i am probably slightly smarter than the spreader bar carried me to victory.
if i were to do this again i would modify the bracket by notching the mounting holes so all you would have to do is loosen the control arm nuts and not remove them.:yahoo::waxer:
 
that might work out, the nice thing about a used spring is it has probably set already . I'm thinking of cutting a 1/2 coil to lower it a tad more too. let me know. what part of Florida are you in?

Orlando, roughly 40 minutes from you..... but I wouldn't cut the coils any more, it's lower than stock and the spring sits correctly in the A-arm and frame pockets - no noise..... I cut the 460's a few years ago and it made some noise going over bumps...
 
oh wow were neighbors, thats easy. the only reason id cut them is i have aluminum heads and the car does sit higher and id like to be down a bit from stock not sure how all that figures out.
 
..... but I wouldn't cut the coils any more, it's lower than stock and the spring sits correctly in the A-arm and frame pockets - no noise..... I cut the 460's a few years ago and it made some noise going over bumps...

I have the 550s in mine. Bottom of fender lip is 27" from the ground with top of tire at 26" (255/60 15 @/24psi). 350 with aluminum heads & intake manifold, tubular headers, mini starter, and no A/C.
Cut springs don't seat right or act the same. I've tried that too.
The rear dual mount is easily adjustable for spring rate: I had to stiffen mine up to balance the handling when I swapped out the 460 fronts to 550s. I have no idea what the # rating is where it's set, but it's fairly stiff. I also had to use longer TA bolts to get the rear down to match the front since the 550s were so much lower than the 460s.
I also agree that the SharkBite set up is just so much bling. The dual mount rear is a lot of bang for the buck and very simple.
 
Last edited:
thats good info on the springs and i will try the uncut version first.


well, after all my bitchin and skepticism i was wrong. and i am not afraid to admit it. that bar changed the whole car, no more rattles and shakes.:footmouth: the car just glides down the road.all in all with my complaints i would do different things to install it but this is one of the few times a product exceeded my expectations.
 
Top