'69 suspension upgrade

Mike
They sell some ceramic coat you can brush on and when you fire the motor and the header heats up it will bake it on. I have seen it used however I can not remember who made it. I will ask the guy I seen use it when he returns from Florida this weekend. It does not look perfect like the original coating however it is close and it will not burn off and allow the header to rust.

I used this stuff with good results.

http://techlinecoatings.com/hi-performance/pdf/exhaust-system-coatings.pdf
 
Thanks for the suggestions, guys. Perhaps while I'm out running around tomorrow I'll check a couple parts stores to see if they've got any of this type stuff. I'd like to stop in a Speed shop, but there's none close by.
 
Got the header in.

Got the welding done on the header, and put some high temp paint on the #1 tube. Down the road I'll send it out for recoating of ceramic.
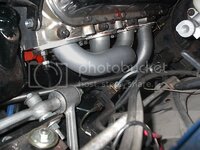
I guessed that there would be an 80% chance that I would need to remove the steering link to be able to slip the header back in. But, every now and then, something actually goes right and ya luck out. With a bit of wiggling, I got the header up in there and bolted in.

IM001105.jpg

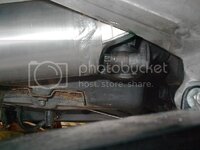
I'm going to make a small heat shield for #7 tube to protect the steering u-joint. It's not as close as the picture suggests, but there's going to be too much radiant heat on the u-joint if I don't.
I can now put the clutch cross shaft in (as soon as I figure out where I misplaced the pivot ball) and the rest of the exhaust system.
I got the brakes bled, after quite a battle with some fitting weepage at the front junction block, and the left rear junction block. It about drove me nuts, as I hadn't run into quite this much difficulty in previous brake work.
There's a light at the end of the tunnel here, but I do keep running into quite a few small nagging issues that end up consuming my time.
 
It's alive!

untitled.jpg

Got the car running this afternoon.

IM001124.jpg

It was good to hear the engine again after 4 1/2 years. Took it for a couple loops of the neighborhood. The steering was a little easier than the old setup, but I think I'll like it. The transmission shifted pretty nice (considering it's a Nash), so I must have gotten all the broken parts out of it. My homebrew alignment seemed pretty decent as the car drove pretty nice. To my surprise and relief, the coolant never got above 210 degrees, despite the 90 degree weather today and the absence of the fan shroud. (My thanks to Tom DeWitt for the nice performing radiator.) I still have to cut and modify the shroud to clear the new A-arms, and I just didn't feel like holding off the test drive any longer while I kept installing, removing, grinding, installing,.......... the damn shroud. Now that I know things are halfway gonna work with this setup, I can start on a few other detail items (hood, side mouldings, rear bumpers).
I'm gonna start trying to get the new engine machine work done pretty soon. I'd like to get the suspension and brake stuff dialed in while the engine is getting the boring and balancing work done, and then pull this engine back out. Now that I've got all the changes made under the hood to get everything to fit, the engine swap ought to go quicker next time.
At least that's the plan. :amused:
 
I didn't know you were that close to gettin' r done. Congratulations:beer:

Thanks, Larry. It just felt good to drive this thing again.
I broke the transmission at a track in Michigan in late '04, so it's been over four years since I've had any seat time in this car. It was the sheer misery of removing the DN5 spd transmission that got me thinking about a removable crossmember. I didn't want to cut up the original frame, so I started looking for an auto frame. Once I started cleaning up the replacement frame I noticed I was always stepping over all these spare C4 suspension parts I had accumulated for the '84. I kind of just put two and two together at that point. I recall someone mentioning something about car projects to the effect that it will cost twice as much and take three times as long as you initially estimate. I had planned on being back on the road two years ago, but that obviously didn't happen. I was surprised at how often I was nickel and dimed on plumbing and suspension parts that I hadn't figured on in the initial project thinking.
 
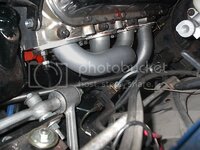
IM001105.jpg

I'm going to make a small heat shield for #7 tube to protect the steering u-joint. It's not as close as the picture suggests, but there's going to be too much radiant heat on the u-joint if I don't.

you might consider a piece of Aeroquip "Fire sleeve" or the silver stuff the Cup guys use.....depending on the od of the joint I might have a piece that would work.
 
Congratulations, It must felt good to drive the Corvette again:drink::thumbs:
 
Congratulations, It must felt good to drive the Corvette again:drink::thumbs:

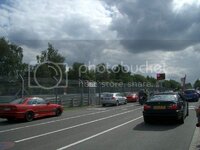
Thank you. It did feel good after all the months of work and frustration. Instead of driving the car around my neighborhood, I really wished there was some way I could have had the car with me last year when I was visiting your country. (That's me in the silver rental car.)

Audi.jpg

The Audi was a nice car, but I'm sure I could have made the guy in the red Porsche check his mirrors a bit more if I had the Vette there. Oh, well. It was fun anyway. :cool:
 
Got the rear end back in today. I took it out last week to remove some of the side yoke endplay. The yokes had about 30 thousandths wear, along with a little bit of clutch/spider gear wear. I shimmed the clutch area to remove a bit of backlash there. I also decided to try running the posi without the spring assembly. I was a bit shy at first about doing that, but after one of the springs flew across the garage (never to be seen again!), and the improvement of the posi action after the shimming, I'm going to give it a try.
I learned from this recent R&R that getting to all the suspension bolts was a lot easier when I put this setup together as a roller frame, versus now when the body is on. I at least learned a few new sequences on how stuff needs to be put together, to avoid having to reach under or through stuff I just bolted on.
I spent about an hour trying to get the driveshaft on, most of it crawling on the floor looking for a few of the u-joint needles that flew around when one of the caps fell off. It's very painful dealing with anything that has to bolt to the Nash 5spd. Just no stinking room with that transmission. After finding all but one needle, I finally had to scavenge one from another u-joint. I put it in, and then had multiple failed attempts to get the cap on without disturbing the needles. I finally dug out the spare needle (thankfuly it had a shiny end on it, whereas the original needles were all dark). I measured the diameter, and found that the originals were .070, and the replacement needle was .077. Crap. So I went through a bunch of old u-joints (thank goodness I keep a lot of that old crap), and found one that had .070 needles. I popped one in, and the cap went on with no trouble. I guess I learned not to trust my eyes when gauging an item that small.
I put "new" side yokes in the rear end when I had it apart. I had a set of HD (cap type) yokes laying around that had little or no wear, so it was a free upgrade. While putting the half shafts on, I almost had one of those "oh shit!" moments. The HD yoke caps are significantly bigger than the u-bolt straps that the other yokes used, and the C4 shafts aren't designed to work with these caps. I had to do some gymnastics to finally get the caps and bolts in, but I still have some concerns about the bolt heads hitting the halfshaft yoke area at full suspension droop. I'm too gunshy about grinding clearance notches in the halfshaft yokes, but I may be able to substitute some 12 point flange bolts in there, as they have a smaller diameter head on them, and might just give me the additional clearance I need. I just need to get the suspension completely assembled, and then do some inspection of that area under full droop.
Hopefuly I can get the car running again soon. I recently found out someone is operating a one mile length autocross course in the area. This looks to be a perfect track to do some suspension evaluation and tweaking, while still keeping the speeds at a reasonable level in case something goes awry.
 
Got most of the rear suspension back together today, and as I feared, the u-joint cap bolts hit the halfshaft at full droop. Looks like about .010 of a dent in the halfshaft yoke. I realize this is a small interference, but I'm still putting off grinding clearance notches as a last resort. I looked around town for some 12 point flange bolts, as it looks like they might take up less space in that area, but I struck out. Thankfully McMaster-Carr has them at a decent price, so I've got some on order.
 
the flange always hits on full droop
I have a bunch of aircraft 12 pnt bolts that I use for the drive & halfshafts.
 
Got the car back running today. I swapped out the u-joint cap bolts with the 12 point flange bolts I ordered, and got a bit more clearance, so it looks like I'm good to go on the rear suspension for now.

IM001138.jpg

Took the car for a short cruise. The carb is a little gummed up yet, and gives me a spit and sputter on occasion. I put a bottle of carb/injector cleaner in the tank to try to dissolve some of the crap.
Next project is the engine. The pistons (standard bore) are on backorder, so I'm leaning towards doing a .030 over, as they seem to be a lot easier to get than standard bore 427 pistons. I've got an autocross at my old club back in Indiana in late August, so I'm trying to get the suspension dialed in and the engine built/installed before then.
 
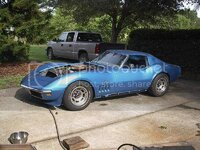
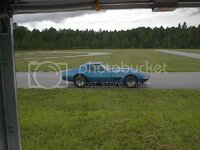
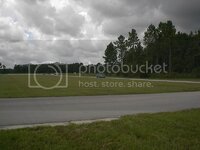
Finally had the opportunity to put some test and tune miles on the car. The Gainesville Sports Car club rented out the road course at Gainesville Raceway (the famous drag strip). It was a relaxed atmosphere, and some very nice people running the event. We had rain on and off, but still had plenty of opportunity to put some development miles on the car. (View out of my trailer.)

IM001159.jpg

IM001156.jpg

The car ran well, much better than I expected (or feared). No suspension breakage/failure issues. I did keep hitting the rear bump stops on some rough sections on the faster right hand corner sections. I'm going to see if I have enough shock travel to allow raising/cutting the rubber bump stops (or modify the lower shock mounts). The car was reasonably neutral in the corners. I didn't detect any of the familiar toe-out twitchiness that the C3 rear suspension is famous for. The Wilwood brakes worked well, although I may have a touch too much rear bias. I might look into a slightly different compound pad to reduce the rear grip, or put a more agressive set on the front, depending on what's available and what won't chew up the rotors.
I did notice how warm the differential batwing got. The aluminum definitely spreads the heat from the center cover area.
I loaded up the car earlier than planned. The alternator/regulator took a dump on me, and the car barely cranked over on my last session. I decided not to push my luck, and risk having to be towed back to the trailer if the battery went completely dead. I noticed that the blade on the red wire on the alternator two wire connector broke out of the connector plastic. I tried pushing the blade back onto the regulator pin, but the ammeter never showed any charging, and the ol' magnetic trick with the screwdriver didn't indicate any charging either. I'll be very disappointed if the regulator took a dump.
Next projects (after the alternator repair) are to install the power steering cooler (the rack did get very warm, as there were a lot of tight corners), figure out how to get more rear suspension travel in compression, and perhaps upsize the front sway bar. I presently have the ('69 original) 15/16 inch bar on it, as I wanted to start out soft on the suspension. I'll swap that out for the 1 1/8 inch bar that I had been running on the old suspension. I'm hoping I won't have to balance that out with the addition of a rear bar, as I would need to find a bar (off a donor car) that is about six inches narrower than the original C3 rear bar. Also, I eventually need to make the fixtures to adjust the corner weights. I don't have a good feel for how far off the weights are at the moment.
 
Check that pigtail that plugs into the alternator too- they have a bad habit of breaking the wires right at the crimp- they look fine, but the wire is broken.

:gurney:
 
Swapped out the front sway bar today from the 15/16" part to the 1 1/8 inch bar that I had on the old C3 suspension. While the car felt darn neutral the other day with the 15/16 bar, it had a bit more lean than I wanted. This bigger bar should help, but hopefully I won't also end up with more understeer than I like. As I mentioned earlier, it doesn't look like it would be fun to try to stuff a compensating rear bar in the back, due to the width requirement, and the lack of space.
I checked out the rear bump stop issue. I was hitting the stops allright, but parts of the rear knuckle were also hitting some frame gussets. The rubber bump stops appear to collapse further than I anticipated. When I was putting the suspension in last year I took a guess on the rubber compression, and then sized the nearby frame gussets to clear the suspension. So, it looks like I'll have to grind a few more clearance notches in the rear frame gussets to clear the knuckle at full compression.
I'm probably going to redo (lower) the lower shock mounts due to this rubber compression distance issue. I just want to allow a bit more "safety travel" to remain in the shock at full suspension compression.
I also ended up rerouting the rear flex lines to the calipers. At full suspension compression, it looked like there was a slight amount of tension on the lines. The new routing looks like it should prevent that. I'll have to bleed the brakes after this rerouting, but I've got a weeper on the front junction block that showed up with the increased pedal pressure that was used the other day, and I'll have to pull a line off to redo it.
I still have to diagnose the alternator output failure. I've got a few old spare parts laying around, so I'm hoping this will be a labor only repair.
Outside of a couple teething problems, I was happy with how the car handled, and happier yet that no frame or suspension stuff broke or fell off out there. ;)
 
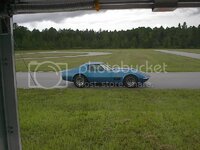
Got the car loaded up to head out for another outing soon. Just for kicks, I hauled it over to a scale at a local recycling site. In the configuration below (picture from a previous outing):

IM001159.jpg

No rear bumpers, no spare tire or bucket, an eighth tank of fuel, and no driver, the scale display showed 3020 pounds. After getting home I weighed the bumpers and brackets (as they'll be going back on when the more important items are crossed off the list) and the spare tire bucket (which will need a minor modification to prevent interference with the rear toe rods. The bumper stuff totalled 19 pounds, and the spare tire bucket came in at 16 pounds, according to my Walmart scale I have in the garage. This gives me a total of 3055 pounds, depending on the two scales' accuracy.
The next engine should remove another 155-160 pounds off the front end. I've had zero luck finding standard bore 427 pistons so far, but there are a couple companies that will make custom ones for me. I'm not happy about their quoted prices, but they seem to be the only game in town.
 
Top