Fuel Tank Check Valve

DC3

Well-known member
Joined
Dec 9, 2008
Messages
332
Location
Lubbock Texas
I installed a new tank mounted fuel vapor check valve back in Aug 2010 to replace the original one which was leaking and had obviously been repaired many times before.

The new check valve started leaking after less than 18 months which means my garage fuel smell is back, especially with a full tank.

New available check valves are plastic pieces of doodoo which means they are probably pretty good copies of the original ones.

I'm looking for something better for my '73. Anyone know of a more robust check valve that will work in place of the factory design?

Thanks,

DC
 
I had the same failure years ago, broke the OEM valve over some fuel related crap, and so bought another check valve, but have thought for some years now, that in fact that thing is totally not needed....

block the 1/4" OD line....tough reach, I know....take the fuel inlet plate off, about a dozen screws around the flange of the top center filler, find you spot, and put in a 1/4" OD vent line to that filler, it's top center and much less likely to need a check valve in the first place....run the line to the canister up front per normal direct hookup....block the front vacuum controlled valve at the CANISTER under left fender to the open position...and run the typical line to the LO pressure/air cleaner induction side of the engine.....meaning LO vacuum, before the throttle/air valve/blades.....

:devil:
 
....block the front vacuum controlled valve at the CANISTER under left fender to the open position...and run the typical line to the LO pressure/air cleaner induction side of the engine.....meaning LO vacuum, before the throttle/air valve/blades.....

Not really following this part. Why do this engine compartment stuff? My vapor canister and hoses are already installed and working correctly. It does a good job of keeping the smell at bay as long as I can eliminate the leak at the check valve.

Thanks Gene.

DC

OK, MY car is a '72, and if pulling the flip up off the body with the 4 screws, it is easy to get to the actual filler neck and gas cap...pull the rubber surround from the filler neck area...drain tube down back also....be careful as to not tear it... there you find the screws above, holding the filler neck to the tank...note the filler neck is about a inch taller and in the center and forward of the tank,.....almost impossible to push gasoline down to the vapor canister....so to put a take off point there for the vapor canister, ABOVE the tank height....block off the left side OEM fitting from the tank...

ON the canister under the left fender, there is a engine manifold direct actuated vacuum actuated valve....as in why? who cares?? block it open and put it to the area above the throttle blades....it's under minor vacuum when engine running...and through the charcoal canister...

:beer:
 
ON the canister under the left fender, there is a engine manifold direct actuated vacuum actuated valve....as in why? who cares?? block it open and put it to the area above the throttle blades....it's under minor vacuum when engine running...and through the charcoal canister...

I followed the first part of your idea the first time. Just can't figure out why you think I need to change the way things are at the vacuum canister and engine when that part of the system is working just fine. I don't see a need to bubba things that work. :) I just want a better built check valve.

DC

I have ONE functioning valve as of now, the other is outta the car and broken, when this one fails, I plan to drill a hole in the tank filler, which is high point center of the tank, mine being a '72, unsure if yours is a later shark....to that line is almost impossible to get gas into it, and so without any check valve can run to the canister up front....my comment about the canister is because I noted MINE had some failure, where the valve was stuck open....so I left the control line off, and let the ABOVE throttle blade vacuum source take whatever it wants outta the canister, seems to work fine, no smells in the garage...SO my only observation is it was much adoo over nothing, my tank runs under a slight/mild vacuum with engine running....you got NO idea the battle of the other way, sealed cap, and so with full tank building pressure here in HOT HUMID FLORIDA, and that check ball being held by expanding pressure, my house/garage door faces directly west...sunlight hit that car ass end and heat that tank a whole bunch...
gas smell, heat expansion, and so the float check valve was stuck closed with full tank....take the old UNvented cap off, and hear the fumes/gas escape upon release...WTF?? but only with full tank....

MY opinion from MY observations, it's a stupid design...sorry guys...just IS....

my concept of the high center on the filler neck just under the cap, to the opened up charcoal canister, open line to the lo vac air induction like mine happened to fail at....it's CASE CLOSED....

I didn't think this shit through.....I stumbled over it over some months....

:hissyfit::hissyfit::surrender:
 
While Gene's suggestion should work and I might end up going that route, I'd rather have a working check valve. So, back to the original question: Anyone know of a more robust check valve that will work in place of the factory design?

DC
 
While Gene's suggestion should work and I might end up going that route, I'd rather have a working check valve. So, back to the original question: Anyone know of a more robust check valve that will work in place of the factory design?

DC

No, not that I know of, the black plastic tends to break and get brittle over time, and cause fuel smells/leaks, I have a functioning one on my car now, stock position, but having fought my fuel setup a lot over the years, I know full well the vent line routing to the canister will be changed to the filler top....:flash:
 
I had a couple of inline stainless check valves 1/8" pipe thread, with very light springs that would work, can't remember what I even used them for, but I believe they were made by Parker. May want to check their listings.

Gene's mod should work at the tank. the later tanks just had the vent going into the top of the sending assembly, no check valve needed. Use your setup at the canister.

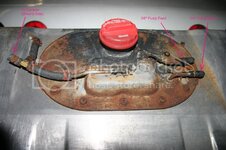
75Tank2.jpg

The line directly below the filler is the main vent terminates inside at entrance.
The one in the upper left that it's tee'd into is just the vent that goes between the bladder and the metal, not needed without a bladder.
 
Thanks Noonie,

I found the Parker check valves but didn't really understand "cracking" pressure and thought better of trying one until I did understand. Sounds like Gene's solution might be the best. I'm just not real sure how our check valves operate. If they vent constantly and only prevent fuel from entering the line, then Gene's idea should work fine. If they actually are a vent valve and only open when the pressure in the tank is at a certain level, then it might make more sense to have a similar setup.

I've also thought of pulling the existing valve and completely covering it in epoxy to eliminate any leaks from the seams. I would have to find a good fuel proof epoxy that is compatible with the plastic housing.

DC
 
Top