Parking Brake on 74 Not Holding

4 SPEED

Well-known member
Joined
Jul 21, 2009
Messages
78
Location
New Jersey
Parking brake on my 74 not holding.
When I pull handle all the way up the parking brake will not hold.
Parking brake was replaced a few years ago so should be ok.
Is there a cable adjustment?

Thanks
 
there's an adjuster on the bottom of the wheel - you access it with the tire off and through the hole in the rotor.
 
Fought this when first got the '72, you have to have IRON shoes in there, not stainless, but DO use the stainless hardware kit.....

the brakes will not hold worth a damn, this is normal, what you need to do to get through inspection is tighten hell outta the cable, drive it a very short distance to the inspection, run it through, it should barely pass, then go around the corner and loosen it up till next time....

We do not have inspection here in NJ
I just want to be able to keep my car from rolling on a non flat surface.
I know I can leave it in gear but if I am working on it while running etc.
What about the adjusters that SuperBuick Guy mentioned?
 
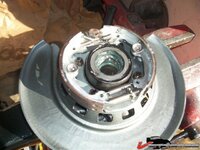
There is an adjuster on the cable but I don't remember where it's at, think it's right under the car, under the handle before the cable goes to the splitter.... anyways, here's what the adjuster on the drum itself looks like:

21493b19ccb0153.jpg

There's a hole in the rotor to access that little wheel with the teeth on it....

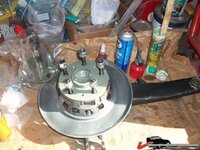
Here's that hole in the spindle (next to the bottom left stud) - obviously when installing the rotor these holes must line up....

21493b19cc2010e.jpg
.

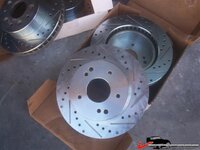
holes in rear rotors (2) - the spindle should have two holes as well but can't see it on the photo above.....

21498edaad04451.jpg

.
 
Yup, Karsten gave you a great set of pix there, should esplain to anyone, even Lucy.....:D

but seriously, expecting a 5" drum to hold much of any car on any incline is not happening,.........I chock wheels as necessary on my uphill drive, and work from there....MY trick is to jack up the front of a FWD car and watch the fun because I forgot to chock the rear wheels.....first skip of the tire and I do and AWWWW SHITTTTTTT moment.....as the car wants to wipe out Ernie's mail box.......:D
 
If the original cables are still on the car chances are they are stretched out.
There is one cable that goes from lever to lever, then there is the cable from the handle to adjuster, just follow them under the car and you will find them.
Now how the parking brake was serviced the last time may have a lot to do with the performance of the system. I have set them up to hold a vette on a 45* incline, keep in mind this is a "parking brake" not an emergency brake.

BTW, I have to mod every new SS kit I use because they are not the best out of the bag. Look at the hold down pins,levers and star wheels.

I would pull the rear rotors and see how the shoes look, see if the star wheel expands the shoes, see if the lever does the same. If those all check out then it's the cable or adjustment. Make sure when you are done the shoes are not dragging on the rotor hat(Drum).
 
Here's a diagram that might be helpful: http://willcoxcorvette.com/instructions/parking brake adjustment 67-82.JPG

And I found the info below somewhere on the web. Unsure of the author:

"C3 Parking Brake Adjustment

C3 parking brakes are difficult for shadetrees to correctly adjust due to some design issues that aren't well addressed and just experience shortfalls.

If you try to adjust the shoes by turning the star wheel until you feel a drag on the rotor/drum you'll confront the design issues. They have to do with the halfshafts going into a bind when the rear suspension is in full droop and the limited slip driving the opposite wheel which will also be in a bind as well as contributing to drag and shoe friction. There is a very specific adjustment method that must be followed, otherwise you'll not have full shoe contact and may
also destroy the shoes.

The meat of the issue is that you have to loosen the adjuster cable to the point where there is no tension on the cable. The cable moves the top of the shoe out in an arch. The bottom part of the shoes only pivot. So, for the most part, what you are adjusting with the star wheel is the bottom part of the shoe. Once you have the bottom part of the shoes adjusted on both wheels, you can put tension on the cable so that when the handle is pulled, the shoes come into equal
contact with the drum.

The tricky part, again, is knowing when you have the bottom part of the shoes in proper contact. If you are off, you'll have contact difficiencies in either the top or bottom of the shoes on the drum. With improper adjustment, the brake mechanism will perform poorly or you'll destroy the brake lining...or both.

So, how does the shadetree deal with this? Not easily. The best way is to disconnect the halfshafts at the spindle flange (not the differential stub axle) so that both rear wheels are not connected to the differential and are free to rotate without any halfshaft binding, opposite wheel drag, or drivetrain drag. Doing it this way will allow you to have a very good tactile sense of when the bottom part of the shoe is contacting the drum. You want light contact so that you
can hear the shoe contact throughout the full revolution of the wheel. Once you have the bottom shoes adjusted on both sides, you can tighten up the cable. With the handle fully retracted, you start adjusting the cable until you hear and feel the full shoe lightly contact the drum. It should be an equal feel and sound on both sides. The drag from the contact friction should be very, very light. Once you think you have the right cable adjustment, pull up on the handle. You should get around three clicks and then strong resistance. If all seems well, button it up and give it a test.

You can do it without disconnecting the halfshafts but, again, for a shadetree, you'll be fighting the ills and your experience level. You'd at least have to jack up both sides of the spindles to put the halfshafts at ride height so you can keep them from binding. Of course, in adjusting the star wheel, you are essentially doing the adjustment based upon your experience in doing it this way. For the most part, you're working from hearing only since you have drivetrain drag contributing to the brake friction.

It does take longer to do it by disconnecting the halfshafts but the outcome is usually better for the shadetree. And it's not like you'll be doing this every couple of months. If you have a good parking brake assembly, you should have to do this only once. So your time is sort of like an investment in the outcome."


Hope this helps.

DC
 
Ummm... good advice, but why would you take the half-shafts off when you could simply take the bolt off the spring and put the spindle at ride height by placing the TAs on jack stands?
 
Ummm... good advice, but why would you take the half-shafts off when you could simply take the bolt off the spring and put the spindle at ride height by placing the TAs on jack stands?

I tried it a couple of different ways but never could get a feel for the shoe contact until I followed the directions in the article. As soon as I got the half shafts disconnected it became very easy to tell just how much shoe contact was being made.

DC
 
if you have a little too much drag it will wear out during the first few miles of driving..... of course, as always: too much is too much.... if the entire wheel gets hot then you have way too much drag.....
:D

if you want the brake to work as good as possible (state inspection) then you might have to accept a little drag.....

I was told that in some states the test procedure says that with the E-brake pulled it must stall the engine when releasing clutch or brake pedal (auto vs stick) from idle.... trick is to lower the idle speed as much as possible.....
 
Thanks for all the info.
I am going to start by adjusting the cable and see what happens.
Will be happy if it holds on a slight incline.
 
Finally fixed parking brake.
One of the cables was frozen up.
Had to replace both cables an adjust parking brake.

Thanks for the input
 
Top