Oil filter pipe/adapter question

69427

The Artist formerly known as Turbo84
Joined
Mar 30, 2008
Messages
3,023
Location
Clinging to my guns and religion in KCMO.
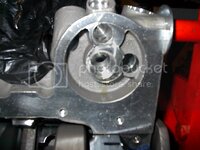
Trying to figure out what I need here. I just noticed that the oil filter area is different on this block. My old block has that aluminum adapter piece that bolts in the round machined area of the block, but it looks like this block doesn't have the inset area or the old pressure relief.
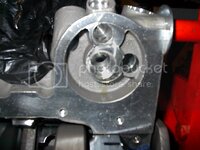
IM001434.jpg

Looks like the filter gasket butts up against the round area, but there's no room for the old type adapter. Is a Gen V or VI block similar to this block? Looks like I need a wierd pipe nipple with a large OD (.910) that threads into the block, and a smaller OD (.765) that the filter threads onto, assuming I can still use my old PF-25 filters. (The filter OD looks compatible.)
So, any suggestions? Anybody have a late big block that can tell me what sort of pipe nipple arrangement goes in here?

thanks,
Mike

Edit: I also need to figure out what fitting I need to block off that hole that short circuits the filter. If you look at the three holes from top 12 o'clock on down, there is a passageway drilled from the top fitting downward. This is just one more issue that's different from the old block, and it's slowing me down.
 
Last edited:
The bosses on the side are for a dry sump setup. Don't you have more of those pretty blue aluminum allen plugs with the engine? They go in there. I'm not sure if they're PT, they might as well be O ring boss fittings (they most likely are) Get a big -12 AN adapter if you have one, if it screws in (unf threads) it's an o ring boss.

The bottom of the block probably takes a generic threaded fitting like any spin on adapter or remote oil filter adapter. I would have thought it came with the block.

Most likely this:
3853870.gif


http://paceperformance.com/index.asp?PageAction=VIEWPROD&ProdID=50
 
Says right there in the text, used on ZL1 block...so that is what you need.
 
The bosses on the side are for a dry sump setup. Don't you have more of those pretty blue aluminum allen plugs with the engine? They go in there. I'm not sure if they're PT, they might as well be O ring boss fittings (they most likely are) Get a big -12 AN adapter if you have one, if it screws in (unf threads) it's an o ring boss.

The bottom of the block probably takes a generic threaded fitting like any spin on adapter or remote oil filter adapter. I would have thought it came with the block.

Most likely this:
3853870.gif


http://paceperformance.com/index.asp?PageAction=VIEWPROD&ProdID=50

That looks like the info I was looking for. The block and filter thread sizes are different, and I was picturing needing an item looking like the picture.

Thanks for your help!
 
:amazed: Ok, is my mammory shot?? I thought they used a 1/2" NPT close nipple on most engines in the past.....

:twitch:
 
I checked and I've got enough plugs for all the external access holes, but I'm still perplexed about the "short circuit" hole between the center passage (the filter outlet into the engine) and the passageway right above it (in the area of the filter inlet). It looks like oil can move clockwise or counterclockwise from 3:00 (the pump outlet) to 12:00, up that passage (which feeds the oil pressure gauge) and then through the visible hole connecting this passage with the passageway feeding the engine.

IM001434.jpg

I'm still trying to figure out what keeps the prefiltered oil from mingling with the post-filtered oil.

Edit: The hole at 12:00 isn't threaded for a plug, but at first glance it looks like an o-ringed plug without threads would slip in there and could possibly be retained by the center threaded nipple OD. But, there's gotta be a simpler explanation for this.
 
Last edited:
On the gen 5/6 there's a primary bypass in the center hole and a secondary in the other hole. So....you need a bypass valve in the center hole and one in the other hole (or block it off completely w/ a plug to eliminate the bypass, use a burst proof filter). the bypass valves must be tapped in place, they are very flimsy so drive them in carefully w/ a socket.

I gather you didn't get instructions with that spiffy block? ;)

I got some basic information, mostly regarding the main cap torques. I don't recall any helpful stuff concerning the oiling system.
 
Cheap bastards!

Well, I finally got done with the piston to valve clearance job. Time consuming to say the least. But, everything looks good so I got the heads torqued down.
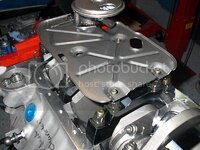
I pulled the oil pump and windage tray off the other engine and started to put it on this engine. (I'm reusing the pump because it only has about 5000 miles on it, and the pickup tube is adjusted to fit the pan I'm also transplanting.) Then I notice that Chevrolet doesn't put the damn oil pump dowels in the rear main cap of the new block. So, one more speedbump to slow down progress with this engine. I also noticed that the main studs in his engine are different than the studs I have in the old engine. I have to figure out what I have to do to get the windage tray mounted.

IM001442.jpg

Notice that a couple of the stud tops don't clear the mounting holes in the tray. I'll have to see how much thread I have in the block to see if it's possible to raise the stud a bit. Or, see if I can transplant a couple studs from the other engine (they're ARP in both engines). But I measured the main cap heights and the caps are about a quarter inch higher/thicker on this engine than the two-bolt caps on the other engine. So, I don't know the solution at this moment.
Another issue I'm curious about is the oil filter clearance to the headers. I see where the Mark IV style blocks have the filter gasket surface machined upward into the block about 13/16" relative to the pan rail flange. The new block (I'm assuming Gen VI style) has the filter gasket surface in the same plane as the pan gasket (easy to see in the picture). This difference places the bottom of the filter 13/16" closer to the header collector which is partially under the filter. Once I get the filter nipple installed (it's ordered, just waiting for it to show up) I can put a filter on it and also trial fit the headers on the engine to see if there's going to be any clearance/heat issues.
I just can't believe how long it's taking me to put this damn thing together.
 
Those trays don't fit w/ ARP studs, same problem on 502 here. Got a Milodon Diamond scraper and it too didn't fit, I had to fabricate tabs on it to get it to attach to the studs AND clear the pan. but it did work.

The problem is, your block is not even true late Gen in that you can not use a bolt on spin on adapter (don't have the 2 threaded holes and the cavity is not there on the others because of the large half moon pocket for the external dry sump hookup) The only thing I can think of that might work is one of those offset adapters like on trucks and LT1s. They offset the filter to the side to clear the exhaust. Only thing, they use a much smaller filter. I don't think anyone makes a spin on 90 deg adapter. They're all set up for the bolt on style 9instead of spin on adapter)

Found this, if used w/ remote mount it would work
http://marine-performance-parts.com/22592.aspx
 
I'm somewhat resigned to figuring out some alternative method to get the windage tray mounted. It's always just a bit frustrating when we can't get one group at Chevrolet to confer with another group at Chevrolet to get some consistency or interchangeability in their parts.

But, the part that genuinely pisses me off is that they didn't put the effin' locating dowels in the rear cap for the oil pump. This lack of a couple of ten cent items just slows up progress while I go out and track some of these down.

Also, I still have to measure the rear main height to see if the oil pump is at a different height on this engine than the old engine. The pickup tube on the pump is welded in position, so I'll be annoyed if there's sufficient cap height difference that would require buying another pump.
 
The dowels are probably not there because the dry sump setup and the use of a girdle over the rear main.

You just jinxed yourself w/ the pump, now that you said it out loud it will not fit LOL
 
The dowels are probably not there because the dry sump setup and the use of a girdle over the rear main.

You just jinxed yourself w/ the pump, now that you said it out loud it will not fit LOL

I must have said several things out loud the past year given the number of serious headaches I've run into with this build. As I mentioned in a previous post, I'm getting more sentimental all the time about my previous (now half disassembled) engine due to how easily it went together and how well it ran during an awful lot of track days.
My sole goal with this engine hasn't been to build some all-conquering powerplant. It was simply to match the performance and durability of the old engine, but with a bit less weight on the front wheels. I'm going to be incredibly disappointed (read: pissed off) if it doesn't meet that goal.
 
Lucked out.

Well, I measured the rear main cap heights, and lo and behold, they're the same height. I was just getting tired of so damn many things not fitting, and this was a nice surprise. Given how many things have been different between these two blocks, I'm thrilled that at least a couple things are somewhat "standard" across the big block line. So, the oil pump should still fit the pan from the old engine.
I also got a couple dowel pins for the oil pump location from the machine shop owner. He was on top of things and asked me about the dowels in the timing cover, and I mentioned that I didn't recall seeing any there. So, got a couple more which saved me a trip later.
I was also talking to the shop owner about my frustration with the main stud height/windage tray incompatability. He dug through a few boxes of ARP bolts on the shelf and handed me one to try. It looked longer, so I took it home and swapped out one of the inner studs. Bingo, it fit perfectly. So I called him and asked if he would sell me just four of these and he said no problem. So it looks like I can get the bottom end finished tomorrow. Unless I run into some serious issues, I ought to be able to finish the engine this week. I just need to put the lifters and pushrods in tomorrow, and then drop the intake manifold on.
Outside of setting the cam button endplay, everything should go pretty quick.
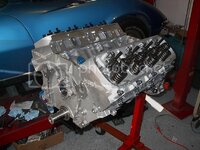
I also am putting some thread sealer in the four (blue) water jacket plugs in the lifter valley. I'm just stinkin' paranoid about one of them loosening and leaking coolant into the engine.

IM001433.jpg
 

Latest posts

Back
Top