Front Fender mod

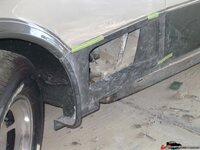
Thanks for that John, just the info I needed. I started on the driver's side today and am pretty happy with the way it's gone so far...

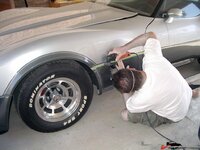
I was still a little apprehensive at this point :cry:
35499d9553b382b.jpg

But got it done ok. The Fein saw makes the job pretty easy and keeps the fiberglass dust to a minimum as well :thumbs:
35499d955514d6a.jpg

35499d955682b33.jpg

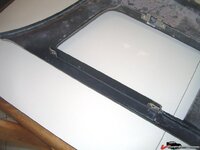
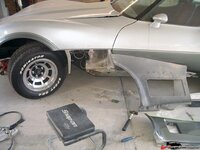
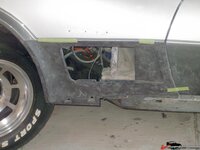
Almost got the donor piece spot on. I was surprised when I first put the new piece up to the car - when I lined up the wheel arch, the back edge of the fender piece was about 1/2 an inch longer than the original fender :confused:
35499d955812651.jpg

35499d9559ee20e.jpg

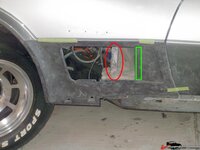
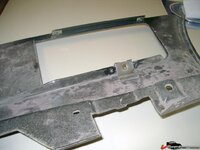
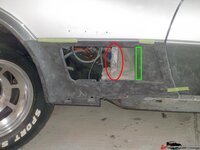
The only real stumbling block is the inner support which I assume is in a different position on an egg crate car. The piece circled in red has to be moved rearwards and be repositioned approximately where the green outline is so that the louver will actually fit in the hole!
35499d9710144bf.jpg
 
Last edited:
good job so far, this is going to look sweet...... the NCRS crowd is going to hate you

:footmouth::stirpot::footmouth:
 
:crap: WTH did you do to your car dude :nuts:
you have some big Kahunas my man because i could never do that,but your work so far looks great,the only problem i saw with the pics is that Christine was not in them,try to take care of that next time :bounce:
 
Thanks for the compliments guys but it's a long way from finished yet and there's ample time to turn it to shit!

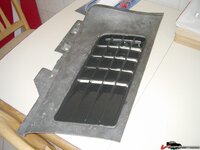
Discovered a new problem today - a minor one but something I need to sort out. In the egg crate louver itself, there's two screw holes on the upper edge and a stud on the lower edge. I have the metal brackets that attach to the fender for the lower stud to go through but what do the two upper screws go into? There's nothing on the back side of the fender pieces. Is there some sort of slip on nut? If there's supposed to be something on the back of the fender, does anyone have any pics?
 
Discovered a new problem today - a minor one but something I need to sort out. In the egg crate louver itself, there's two screw holes on the upper edge and a stud on the lower edge. I have the metal brackets that attach to the fender for the lower stud to go through but what do the two upper screws go into? There's nothing on the back side of the fender pieces. Is there some sort of slip on nut? If there's supposed to be something on the back of the fender, does anyone have any pics?


drywall anchors would work

:smash::lol::smash::lol:


Can you 'glass a nut on the back side of the fender ??
 
I dont have a pic (freggin cam died) but on top inside theres a lip about 3/4 in. and 2 slip retainers same as the botom one.
One is close to the front and the rear is about 2 in from the rear.
Look inside the egg crate there should be 2 holes from them.

Just align the ss slip retainer on the lip and that's it.

Hummm I just notice on the pic where you are cutting with the wheel that you dont have a upper lip. just the bottom one. Different than mine, a 72?

Maybe build a lip out of fibreglass or glue some kind of angle alu or something.
 
Last edited:
I dont have a pic (freggin cam died) but on top inside theres a lip about 3/4 in. and 2 slip retainers same as the botom one.
One is close to the front and the rear is about 2 in from the rear.
Look inside the egg crate there should be 2 holes from them.

Just align the ss slip retainer on the lip and that's it.

Hummm I just notice on the pic where you are cutting with the wheel that you dont have a upper lip. just the bottom one. Different than mine, a 72?

Maybe build a lip out of fibreglass or glue some kind of angle alu or something.

The driver's side piece I'm using almost looks like a replacement piece as it's just black without evidence of any colour on it at all. The piece I have for the passenger side has been cut from a car but it also has no upper lip for the screws to go into. Weird.

I've just looked at Doc Rebuild's site and the page with replacement panels etc shows a 70-72 Fender Louver Upper Reinforcement 2 reqd MM. Page 197 of his catalogue.

It's not a problem glassing in a piece of angle aluminium, but I'd rather use the slip on "U" nuts rather than glass the nuts in place. Again from Doc Rebuild 70-72 Louver 14 Piece Mounting Kit with 4 chrome screws, 4 U-nuts, 4 rivets & 2 nuts with integral star washers. Does 1 car 8147152 $4.25


On another note, does anyone have the guide to where the holes go to mount the STINGRAY script on the fenders? I believe there's a page in the AIM showing the dimensions if someone wouldn't mind scanning it please? Of course, my 82 books don't show this... :lol:
 
Last edited:
Everyone is going to laugh, but when I needed the two upper bolts/clips/retainer whatever for my rear license plate holder/frame....I used a 1x2 block of 3/4 plywood, ran a wood screw into it.....lasted some 15 years...came out clean just now for the repaint....so you would take them in position, drill and shove a stainless screw into it....be there longer than we will....

:smash::eek:
 
I'll keep the wood idea in mind but the way that 8115 works, it'll be ridiculously simple to glue a bit of angle aluminium onto the fender piece before I stick it to the car.

Speaking of 8115, that shit is incredible! From this pic, I said the bit in red got in the way of the new louver and would need to be removed or repositioned:
35499d9710144bf.jpg

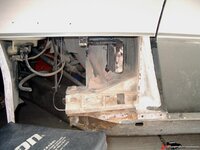
I thought I could probably not even bother with that piece at all but in the end I decided to at least put some form of support there. So, I spent a couple of hours yesterday and removed just the amount that was in the way, cut another piece of scrap fiberglass and glued them in like this:
35499fc114e4c53.jpg

I checked it this morning and wow! I wasn't actually convinced yesterday that this stuff was as good as I've read and was prepared for it to fall off in my hand but I hung off that piece and got the whole car rocking and the piece is still there.

I should have the angle piece glued in and have the panel ready to fit this week but I'm off to Bahrain this coming weekend for our band's debut international gig! The BOSS will just have to wait...
 
I dont have a pic (freggin cam died) but on top inside theres a lip about 3/4 in. and 2 slip retainers same as the botom one.
One is close to the front and the rear is about 2 in from the rear.
Look inside the egg crate there should be 2 holes from them.

Just align the ss slip retainer on the lip and that's it.

Hummm I just notice on the pic where you are cutting with the wheel that you dont have a upper lip. just the bottom one. Different than mine, a 72?

Maybe build a lip out of fibreglass or glue some kind of angle alu or something.
The two slip retainers on the upper lip, are they threaded nuts that a machine screw goes into or are they the sort to take a self tapping type screw?
 
Same type of screw used for the rocker cover and other trims on the car, it had a little philips head about an inch long screw. it was slipper over the fibreglass lips

The clip was not ss it was rusted and screw stuck to it, one got out and the one on the upper lip tore up the fibreglass.
 
Same type of screw used for the rocker cover and other trims on the car, it had a little philips head about an inch long screw. it was slipper over the fibreglass lips

The clip was not ss it was rusted and screw stuck to it, one got out and the one on the upper lip tore up the fibreglass.
Ok, so a machine screw then. Are you able to take a pic of the lip yet?
 
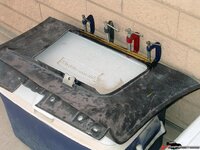
I bought a piece (5 meter length!!) of 3/4" angle aluminium and glued a piece to the fender insert. I had to trim about 1/4" inch off the "upper" edge as it looked like it might interfere with the joining of the panel later.
3549a4f609b7d86.jpg

I found some "body nuts" in town and got the holes drilled and the nuts on this morning.
3549a4f60aa43e7.jpg

3549a4f60b86f53.jpg

The louver fits ok and the screws pull it up ok, although there is a small gap running along the lower edge of the louver. I'll see how it looks once the panel is all bonded to the car.
3549a4f60d86f63.jpg

3549a4f60c9ceda.jpg

I'll try and get it fitted to the car next week.

I managed to replace the broken lower stud, but not without incident! I drilled deep enough into the stud so that the easyout started to bite but I decided I'd drill just a little deeper. Of course, the very tip of the drill bit snapped off. I managed to get it out using a rotary burr on my Dremel but by then, the hole was too large to use the original size stud (3/16"). So, back to the shop to get the next size up drill and tap (1/4"). Unfortunately, the hole was still a bit too big for that - I got the hole tapped but it was super sloppy. I didn't want to go up another size, plus, the shop was shut!

What would Bubba do? I found a piece of steel tube that was slighty larger outside diameter than my hole. I trimmed a piece to length, cleaned it and the hole really well then coated the piece of tube (tubelette?) with super glue then smacked it into the hole! Using a center punch, I staked the tube/parent metal join line a couple of times. That sucker's not going anywhere. I couldn't use heat to solder the piece in there as that would have ruined the finish on the outside. Anyway, I gave it a while to cure then I ran the 3/16" tap into the tube and cut a lovely thread. I ran a bolt into it after I covered the threads with Loctite thread lock. After the Loctite cured, I cut the bolt off to the right length. Perfect... :lol:
 
Last edited:
Top