phantomjock
Well-known member
SO. The Giovanni 6 link suspension has had a number of DIY pproaches - and here is another; "JIM'S GIOVANNI"
One thing that struck me about many of the approaches - they (like the Giovanni Patent) all are securred to the differential. That has always bothered me. Typically suspension system components are part of the chassis and not the driveline.
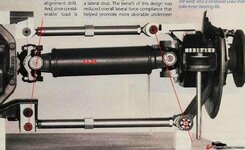
In my approach - I chose to use the Differential carrier (crossmember) as the main chassis component - not the differential carrier itself.
I also wanted to use simple materials with an eye to making the set up easy to replicate, use standard hardware (auto/race/circletrack) and easy construction methods.
No CNC - (although I have access to one - I don't cut metal on it) and no "outsourcing."
Buy - Cut - Weld - was my mantra.
I have bugged any number of folks that have built these setups, and reverse engineed a number of approaches. This may not be ''elegant," but if it tests out as well on the road as it does in the garage (once I solve the annoying Heim Joint problem - separate link), I will be more than satisified.
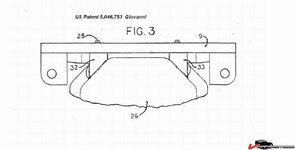
So what does the Giovanni look like? Here is an image from his Patent:
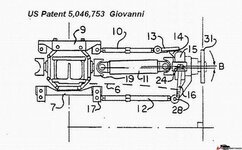
Item 9 is the part fastened to the differential.
Here in Figure 3 from the patent you see the tabs for the upper control rods:
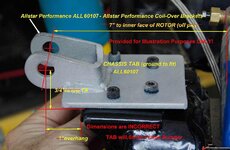
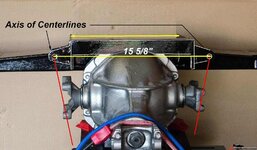
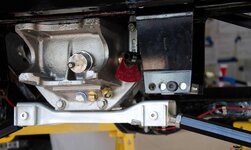
This image shows how I approached mounting to the crossmember rather than the Diff.
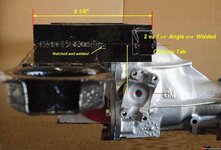
I built the pieces from comercially available angle ''iron." Welded 2 together ( one cut and notched as shown, and then welded to the crossmember.
Lots of weekend fiddeling with models and moving pieces around, but the results are VERY favorable (regarding Camber Change.)
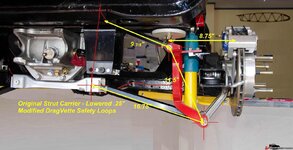
For the Wheel End of business - I chose again to Buy - Cut - Weld, this time on a set of Dragvette Safety loops. They are about 100 bucks a pair and I took some time in making that decision. But the results are really good.
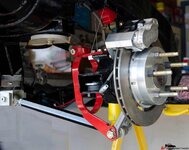
To modify the lower control rods (lower) I used some aluminum plate to build a set of spacers and "lowered" the stock corvette strut rod carrier with longer bolts.
 ]
]
The following graph shows the Giovanni results and mine over the same range of motion.
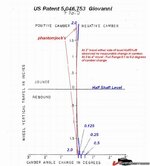
I have achieved less camber change over the same range of motion - for a much lower cost - and I am convinced as sturdy a setup. AND, I can drop the diff and leave much of the suspension intact!
My results are great for camber - but I need to get longer upper rods to be able to set the Toe-In where I want it.
I will be using slip joint Half Shafts from Tantons - Have them - just not installed yet. First I need to solve the slop in the Heim Joints - that is another post... (FYI http://www.vettemod.com/forum/showthread.php?t=7704 )
Çheers - Jim
One thing that struck me about many of the approaches - they (like the Giovanni Patent) all are securred to the differential. That has always bothered me. Typically suspension system components are part of the chassis and not the driveline.

In my approach - I chose to use the Differential carrier (crossmember) as the main chassis component - not the differential carrier itself.
I also wanted to use simple materials with an eye to making the set up easy to replicate, use standard hardware (auto/race/circletrack) and easy construction methods.
No CNC - (although I have access to one - I don't cut metal on it) and no "outsourcing."
Buy - Cut - Weld - was my mantra.
I have bugged any number of folks that have built these setups, and reverse engineed a number of approaches. This may not be ''elegant," but if it tests out as well on the road as it does in the garage (once I solve the annoying Heim Joint problem - separate link), I will be more than satisified.
So what does the Giovanni look like? Here is an image from his Patent:

Item 9 is the part fastened to the differential.
Here in Figure 3 from the patent you see the tabs for the upper control rods:

This image shows how I approached mounting to the crossmember rather than the Diff.

I built the pieces from comercially available angle ''iron." Welded 2 together ( one cut and notched as shown, and then welded to the crossmember.

Lots of weekend fiddeling with models and moving pieces around, but the results are VERY favorable (regarding Camber Change.)
For the Wheel End of business - I chose again to Buy - Cut - Weld, this time on a set of Dragvette Safety loops. They are about 100 bucks a pair and I took some time in making that decision. But the results are really good.

To modify the lower control rods (lower) I used some aluminum plate to build a set of spacers and "lowered" the stock corvette strut rod carrier with longer bolts.
 ]
]The following graph shows the Giovanni results and mine over the same range of motion.

I have achieved less camber change over the same range of motion - for a much lower cost - and I am convinced as sturdy a setup. AND, I can drop the diff and leave much of the suspension intact!
My results are great for camber - but I need to get longer upper rods to be able to set the Toe-In where I want it.
I will be using slip joint Half Shafts from Tantons - Have them - just not installed yet. First I need to solve the slop in the Heim Joints - that is another post... (FYI http://www.vettemod.com/forum/showthread.php?t=7704 )
Çheers - Jim
Last edited:

