LS Swap in 78 Vette

Vintage Air Install

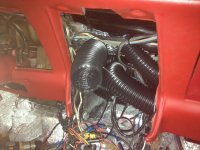
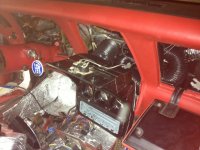
Got the inside portion of the VA installed today. Pretty tight with routing the hoses. Had to make a few on the fly mods but no big deal. Not the best knobs but better than stock. Going to keep looking.
 

Attachments

  • Corvette Vintage Air Dash Duct Passenger.JPG
    Corvette Vintage Air Dash Duct Passenger.JPG
    124.3 KB · Views: 31
  • Corvette Vintage Air Center Hoses.JPG
    Corvette Vintage Air Center Hoses.JPG
    138.9 KB · Views: 33
  • Corvette Vintage Air install center dash.JPG
    Corvette Vintage Air install center dash.JPG
    139.2 KB · Views: 33
  • Corvette Vintage Air Knobs.JPG
    Corvette Vintage Air Knobs.JPG
    136 KB · Views: 32
Radiator and Electric Fans

Got the radiator, electric fans from a z28, condenser and tranny cooler mounted to the radiator support. The Z28 fan fit with very few mods. Mounted the fan relays under my Holley ECU. Thanks to Bullshark and Tim for the help. Sorry forgot to take pictures.
 

Attachments

  • Corvette LS Radiator Support.JPG
    Corvette LS Radiator Support.JPG
    149.7 KB · Views: 18
  • Corvette LS Electric Fans.JPG
    Corvette LS Electric Fans.JPG
    144.7 KB · Views: 22
Last edited:
Sensors and Gauges ??

I want my old gauges to work correctly, so am I going to need some redundancy in sensors for this to happen?
Oil pressure sender, what kind and where does it mount?
Temperature sensor, the Holley ECU uses one, but will I need a additional one for the gauge to work?
Alternator wiring, I have the truck alt but which wire do I use to get the Alt gauge to work?
 
You'll need the stock vette oil pressure sender. It mounts in the LQ9 sender stock locsation behind the intake with an adapter.
http://www.speedwaymotors.com/LS-Series-Oil-Pressure-Sender-Adapter,20928.html
You'll also need a stock vette temp sender for the gauge as wll as the holley one for the ecu. If they're small enough, you can use the LQ9 stock temp sender location with an adpter. If it's too big, my 68 sender was 1/2" NPT, drill and tap the drivers side brass block plug.
Metric to NPT adapter.
http://www.speedwaymotors.com/LS1-Water-Temperature-Sender-Adapter,8195.html
Your factory voltmeter will work as is, no direct connection to the alt.

I want my old gauges to work correctly, so am I going to need some redundancy in sensors for this to happen?
Oil pressure sender, what kind and where does it mount?
Temperature sensor, the Holley ECU uses one, but will I need a additional one for the gauge to work?
Alternator wiring, I have the truck alt but which wire do I use to get the Alt gauge to work?
 
Going to drill and tap the head for the water temp since they are still in machine shop getting valve job.
On LS forum a suggestion was to put the oil pressure on the oil bypass fitting?
 

Attachments

  • Corvette LS oil bypass.JPG
    Corvette LS oil bypass.JPG
    144.3 KB · Views: 15
  • Corvette LS oil bypass adapter.JPG
    Corvette LS oil bypass adapter.JPG
    33.8 KB · Views: 17
What size is your temp sender? I ran into an issue with an aftermarket sender was too deep for the head boss. And there wasn't enough material to drill and tap for the 68 1/2" NPT sender.
You can run the oil pressure sender in the stock location with the 1/8" NPT adapter from Speedway or you can run it on the vette oil coller bypass if you can find one with the port. That port is metric and will need to be tapped too.
I have an unported bypass if you need one.
 
Last edited:
Engine to Assembly

The block was bored .030 over and decked. Heads were cleaned up with 3 angle valve job and new springs. The engine block, heads and other parts delivered to engine assembler yesterday. Hope he gets snowed in so he can finish the engine up tomorrow.
 

Attachments

  • Corvette LS Heads.JPG
    Corvette LS Heads.JPG
    130.1 KB · Views: 20
  • Corvette LS Engine Block LQ9.JPG
    Corvette LS Engine Block LQ9.JPG
    140.3 KB · Views: 23
  • Corvette LS Probe Pistons.JPG
    Corvette LS Probe Pistons.JPG
    106.3 KB · Views: 16
  • Corvette LS Forged Rods.JPG
    Corvette LS Forged Rods.JPG
    98.7 KB · Views: 16
Engine bay is ready for LS. Waiting on engine assembly. Holley ECU is mounted and fan relays underneath in the passenger wheel well. Mounted the A/C dryer below on the inner fender well. Most of the interior is in. CorvetteLSHolleyECUShelf1_zps61c18b4e.jpg
 
Holley LS Bracket

Got the Holley LS Brackets assembled and the EGR block off plates made yesterday. Very nice machining and finish on the Holley Brackets. Hope I have the engine next week.
 

Attachments

  • Corvette LS Holley Alt Bracket Rear 2.JPG
    Corvette LS Holley Alt Bracket Rear 2.JPG
    119.5 KB · Views: 22
  • Corvette LS Holley AC Front Bracket.JPG
    Corvette LS Holley AC Front Bracket.JPG
    127.2 KB · Views: 20
  • Corvette LS Holley AC Bracket Rear.JPG
    Corvette LS Holley AC Bracket Rear.JPG
    112.2 KB · Views: 19
  • Corvette LS Holley Alt Bracket Front.JPG
    Corvette LS Holley Alt Bracket Front.JPG
    144.7 KB · Views: 20
Last edited:
Engine ready to Install

Finally got the engine tonight and ready to install starting tomorrow.
 

Attachments

  • Corvette LSX engine 6.0.JPG
    Corvette LSX engine 6.0.JPG
    146.4 KB · Views: 21
What time are you going to be at the hanger? Would love to check out the new motor.
 
Engine is Installed

Got the engine installed today and the transmission mated up. Ran into a problem the machine shop was supposed to fix and I didn't notice until it was to late. There was a broken bolt in the cylinder head that was supposed to be removed while they were in for a valve job. Found out the hard way while trying to bolt on the driver side exhaust manifold. Loaded the whole car on a trailer and going to let them figure out how to get it out now. Should have caught it when I picked them up and the engine assembler should have caught it before he assembled the engine. Lesson learned write it down.
Anyway a good day. The engine fits great. Passenger side exhaust manifold is bolted on. The starter is bolted on.
More fun tomorrow.
 

Attachments

  • Corvette LSX engine bay.JPG
    Corvette LSX engine bay.JPG
    149.9 KB · Views: 20
Guessing the rear drivers exhaust manifold bolt?
Both my engines came with the same one broken.
 
Quite the adventure today. Long story but I need to tell it. Got a few miles on the vette riding on a trailer. Took the vette up to the machine shop that did the valve job and they were supposed to remove the broken exhaust manifold bolt on the head, that I noticed and told them about it in the beginning of the overhaul.
In the mean time several weeks I forgot about the broken bolt, picked the heads up and delivered to the assembler. He sits on them for a couple of weeks until its my turn to be assembled. He assembles doesn't check, since he assumes the machine shop did the job correctly. Well the machine shop didn't complete the job and left broken exhaust manifold bolts in the left head.

I stop by the machine shop this morning and he promptly removes the front bolt on the drivers side and I am all good to go. Not so fast. I trailer the car back to shop, start to put the exhaust manifold on and there is a broken bolt the back of the head next to the fire wall. Kicking myself all the way back to the machine shop, that I didn't check all the holes while I was there. Loaded vette back up on trailer, I am getting good at this now. Deliver back to machine shop and they pulled the engine out and removed the other broken bolt since its next to the firewall.
Will pick up and resume the engine install tomorrow.
Mad at the machine shop and the assembler as they both came with good references. The machine shop stood behind his goof up and fixed the problem so it only cost me time and gas. The guy that works on the heads said to me that he sees broken bolts on the driver side heads all the time. I wanted to choke him out. I can only hope at this time that the valve job was done correctly.
 
Last edited:
Got the vette back on the rack this morning. Made some progress and a few minor issues to address.
Transmission cooler lines are hooked up and routed. Mounted the A/C bracket and had a clearance issue with the elbows coming out the top. Don't think it would clear the hood so picked up and elbow and a tee fill valve and good to go.
Water pump 90's are real close to the A arm hopefully won't be a problem with alignment.
Attempted to mount the power steering and alt bracket and the pulley on the PS hits the A arm so need a smaller pulley. Did get the PS hoses made for the jeep box.
 
Last edited:
Well that seems like it was fun. If if makes you feel better, I probably wouldn't have checked the bolt holes before leaving the machine shop, either.

At least they took care of it for you. I wouldn't worry about the valve job just yet. All the good places make a mistake once in a while.
 
Top