Is the vapor line on the water pump something you added? What is it's function?
You are using an out of date browser. It may not display this or other websites correctly.
You should upgrade or use an alternative browser.
You should upgrade or use an alternative browser.
My '76 restoration (long post)
- Thread starter denpo
- Start date
denpo
Carburated Nihilist
Yes, I did drill and tap the hole. LS block have vapor lines that you're supposed to connect to the top of the radiator. Since I don't have this connection the simplest way to eject those water vapor is to route them to a high point in the water pump. It's a rather common mod for LS swaps. I should post a picture once it's connected.Is the vapor line on the water pump something you added? What is it's function?
mrvette
Phantom of the Opera
Here I thought the top of my SBC with LT1 injection and HEI up top, looked like a mess.....that LS blows my mess away.....:clap:
denpo
Carburated Nihilist
Here I thought the top of my SBC with LT1 injection and HEI up top, looked like a mess.....that LS blows my mess away.....:clap:
Well, they put a plastic cover on them for a reason.
It will eventually be dressed up a little, but motor beauty contest is not my game.
denpo
Carburated Nihilist
Good progress were made this week.
I"ve cut the MAF sensor wire to length and wrapped it.
Also got the little plug on the back of the passenger valve cover, one of the last piece of the PCV crank upgrade.

In the back I've got the oil pressure sensor in, I'm also done with the wrapping of the wires. All the corrugated tube is the actual stuff, straight from the scrapyard, It's cheaper, it much better quality than the flimsy cheap auto store stuff.
Problem is it comes dirty, and the camera flash tells me some haven't been properly washed, if any. I'll probably give the whole engine a good cleanup once it's all plugged air tight.
Now I realize I'm king of concerned about wrapping up the loom with some cheap electrical tape. It doesn't stand the heat and get slimy/goo-y/sticky as it ages, I think I'm gonna try to find better adhesive for that job. I really like the fabric style I've found in scrapped cars loom.

Now the meat of this week job, wrapping up the loom. Not entirely done yet, I still have the ODBII port to plug, along with the clutch switch, the tach signal, the engine check lite and the oil pressure signal.

I bought a 'cripple-it-yourself' fuse-relay box.

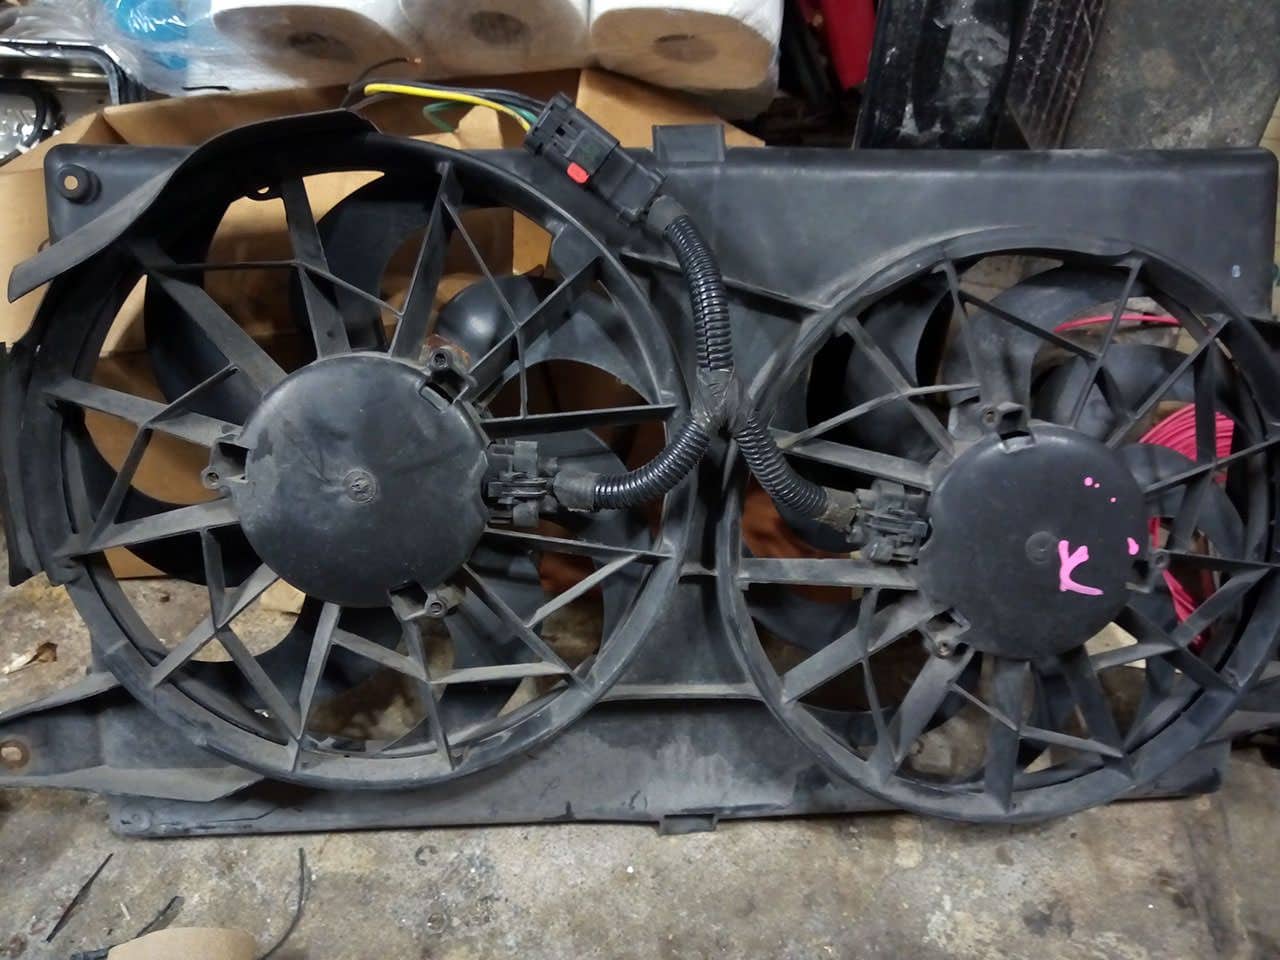
And finally found a double fan setup that's just the size of my radiator, comes from a Sebring.
I went ahead of tubing problem and installed a straight water neck.

I revised the plumbing of the vapor lines as they were rubbing the throttle cable arm. Also installed the just received tube you can see in the back, which is the last piece of the PCV puzzle.
I'll clean those hose clamp from the scrapyard someday, no much time for it right now.

Not comes the 'fun' part, wiring the OBDII port, hook up the PCM programmer and see if those two are willing to talk.
I"ve cut the MAF sensor wire to length and wrapped it.
Also got the little plug on the back of the passenger valve cover, one of the last piece of the PCV crank upgrade.

In the back I've got the oil pressure sensor in, I'm also done with the wrapping of the wires. All the corrugated tube is the actual stuff, straight from the scrapyard, It's cheaper, it much better quality than the flimsy cheap auto store stuff.
Problem is it comes dirty, and the camera flash tells me some haven't been properly washed, if any. I'll probably give the whole engine a good cleanup once it's all plugged air tight.
Now I realize I'm king of concerned about wrapping up the loom with some cheap electrical tape. It doesn't stand the heat and get slimy/goo-y/sticky as it ages, I think I'm gonna try to find better adhesive for that job. I really like the fabric style I've found in scrapped cars loom.

Now the meat of this week job, wrapping up the loom. Not entirely done yet, I still have the ODBII port to plug, along with the clutch switch, the tach signal, the engine check lite and the oil pressure signal.

I bought a 'cripple-it-yourself' fuse-relay box.

And finally found a double fan setup that's just the size of my radiator, comes from a Sebring.

I went ahead of tubing problem and installed a straight water neck.

I revised the plumbing of the vapor lines as they were rubbing the throttle cable arm. Also installed the just received tube you can see in the back, which is the last piece of the PCV puzzle.
I'll clean those hose clamp from the scrapyard someday, no much time for it right now.

Not comes the 'fun' part, wiring the OBDII port, hook up the PCM programmer and see if those two are willing to talk.
Your making quick progress. All that wiring would make my head explode!
Where did you find the fuse/relay box?
Where did you find the fuse/relay box?
denpo
Carburated Nihilist
Thanks, I have to admit I wouldn't have gone anywhere without all the precious information on lt1swap.com, this website is amazing for LS swaps.Your making quick progress. All that wiring would make my head explode!
Where did you find the fuse/relay box?
Here is the fusebox, I don't buy much on Amazon but I didn't want to wait for months to get the part. The part is very well made, only 'downside' is that the main relay is a RTT7121a, a dedicated power relay that is pretty hard to find.
vette427sbc
Well-known member
I use a bunch of different tapes by Tesa... They make the cloth-like tape, but I wouldnt recommend it for engine compartment stuff... They have all different types, but I dont know any stores that will carry it in stock. Mostly an online order type deal. I have used 3M super 33+ for engine looming before, as long as its not near any major heat sources like headers its fine. Some heat shrink or even a zip tie at the end of your loom will prevent it from unraveling.
http://www.tesatape.com/industry/automotive
Looking great! :beer:
http://www.tesatape.com/industry/automotive
Looking great! :beer:
denpo
Carburated Nihilist
Thanks!I use a bunch of different tapes by Tesa... They make the cloth-like tape, but I wouldnt recommend it for engine compartment stuff... They have all different types, but I dont know any stores that will carry it in stock. Mostly an online order type deal. I have used 3M super 33+ for engine looming before, as long as its not near any major heat sources like headers its fine. Some heat shrink or even a zip tie at the end of your loom will prevent it from unraveling.
http://www.tesatape.com/industry/automotive
Looking great! :beer:
Again a reply I didn't get the notification of, but this time I took the time
to fix my thread subscription settings, shouldn't happen anymore.
Well, as I type the tape haven't showed up yet, not I moved a bit forward with 3M super 88, which, to my understanding, is a thicker version of the 33+, good stuff.
Paragon sells a wiring tape that is not sticky but it clings to itself like Saran wrap. It's made by Plymouth Rubber Company.
Paragon Number: 587
GM Part Number:
O.E.M. wiring harness tape, nonstick 1 1/4x108" roll.
Years: 1953 - 1982
Condition: New
Packaging: Each
Type: Stock
Price: $8.00
https://www.paragoncorvette.com/p-359311-oem-wiring-harness-tape.aspx
Paragon Number: 587
GM Part Number:
O.E.M. wiring harness tape, nonstick 1 1/4x108" roll.
Years: 1953 - 1982
Condition: New
Packaging: Each
Type: Stock
Price: $8.00
https://www.paragoncorvette.com/p-359311-oem-wiring-harness-tape.aspx

denpo
Carburated Nihilist
Interesting, and fairly priced.
I wonder if it also goes in the engine? I don't remember taking any out from the source car of my resto, but I doubt there was anything that haven't been touched by Bubba.
I wonder if it also goes in the engine? I don't remember taking any out from the source car of my resto, but I doubt there was anything that haven't been touched by Bubba.
vette427sbc
Well-known member
The vinyl wrap was used in the engine compartment harnesses, but after dissecting more than a few 60's/70's GM engine harnesses, I can tell you It doesn't fare too well with 100+ degree heat cycles. It becomes brittle and falls apart in the higher heat areas. That being said, it is far nicer to unwrap should you need to service something...
but who knows, maybe the 3M super33 will do the same thing after 40+ years :clobbered:
but who knows, maybe the 3M super33 will do the same thing after 40+ years :clobbered:
denpo
Carburated Nihilist
I definitely don't get reply notification, whatever the setting.The vinyl wrap was used in the engine compartment harnesses, but after dissecting more than a few 60's/70's GM engine harnesses, I can tell you It doesn't fare too well with 100+ degree heat cycles. It becomes brittle and falls apart in the higher heat areas. That being said, it is far nicer to unwrap should you need to service something...
but who knows, maybe the 3M super33 will do the same thing after 40+ years :clobbered:
We'll see. First this engine has to get hot at least once... someday.:smash:
denpo
Carburated Nihilist
Alright, big update.
One pictures tells it all :

My best Vette buddy Michel came to help and we managed to pull the failed SBC out. I Spend the whole week before removing all the connections and accessories to make the removal as steamlined as possible.
I started installing the scattershield backplate, the Sachs NFW1050 flywheel and the LS7 bearing. I'm ordering a BBC clutch today. People on the internet recommend having the flywheel and clutch balanced as a whole since I must removed the locating pins and make a combo that was not intended by the manufacturer. I'll ask shops around for a quote.
With the motor out I could finally check for something I feared would cause me headaches: the clutch linkage, and I haven't been disappointed....
I bought in advance the Scoggin Dickey clutch ball adapter for Corvette, and I have many problems with it.
First it does not locate the ball at the same place, below is a pic taken on my SBC, it might not be obvious because of the perspective (sorry, not much room to shot), but the bracket, which lines up vertically with the top hole (the one without the ball stud), pushes the stud further toward the front by approx. 1/2". I would need to test with the LS in the engine bay to confirm that, as I'm assuming the bellhousing ends up at the same location. Otherwise I'm in for much more troubles as I'd have to change the transmission mount.
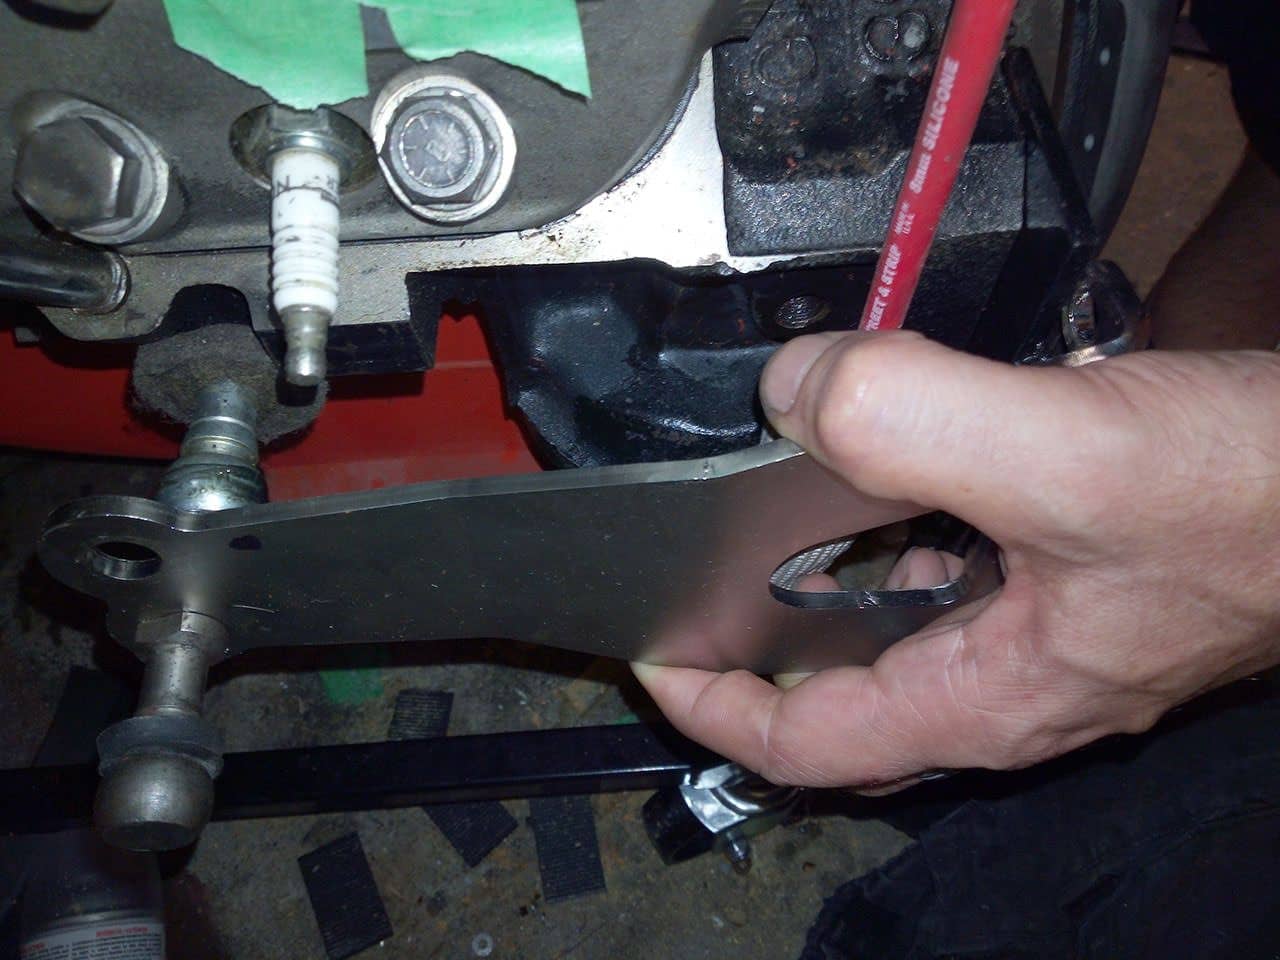
Then, on the LS, the bracket just don't fit, there is a metal tag of the block poking out in the way. Seem like material to drill mounting hole in some configuration, still, cutting in the block is something I'll think about twice before doing.

Then, the piece de resistance of the whole ordeal is that the stock LS6 exhausts are totally in the way, mind you, the stud should be in the upper hole to be aligned with the frame side of the zbar mount.

Sooo, I'm at the crossroad of some significantly different scenarios:
1. I move from stock manifold, to header.
pros : more powaa, I keel my z-bar assembly as it.
cons: more $$$, I lose cool engine bay (in term of temperature) and the catalytic converter setup I aimed for.
2. I move from z-bar to hydraulic clutch.
pros : I keep at the exhaust setup I originally planned for.
cons : more $$$, more complicated setup, less direct connection with the drivetrain (a concept I like)
3. I get creative with the concept of Z bar.
As the zbar sits on two ball studs, it allows for significant amount of misalignement, add to that some custom frabrication (some sort of crank style cut out), I might be able to get around the exhaust.
pros: I change nothing, cheap
cons: some more fab.
In the case I'd go hydraulic, since I know my throw out bearing setup works, I was much more inclined to use a push style cylinder, as the scattershield has those mounting hole just above the fork.
Anyone know about those tabs? Were they intended for that, if so, is there existing setup you know would work?
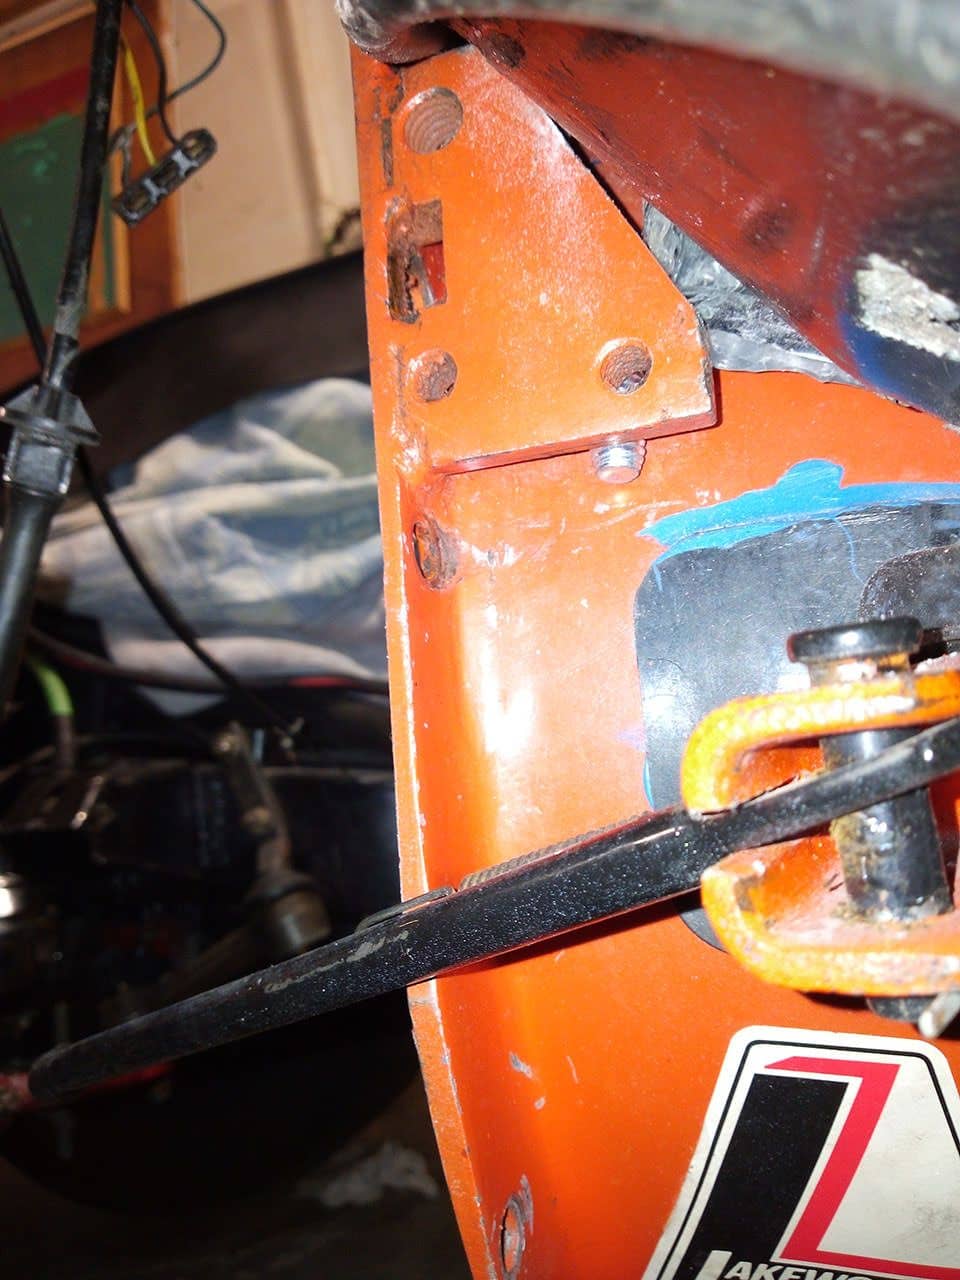
Now, to finish on an high note, here's a view on my home made oil priming solution: took a M16 1.5 bolt, drilled and tapped, note the optional duct tape always on option.

Connected to my good ol' walmart garden pump. I pushed in the entire oil content, that should suffice.

I also indulge myself with some custom bracket for my d585 truck coil pack. I was rather inexpensive.
As I've switch sides with the fuel rail I have an interference with the coil, I'll probably cut the tab and try to bend the line away from the coil.

One pictures tells it all :

My best Vette buddy Michel came to help and we managed to pull the failed SBC out. I Spend the whole week before removing all the connections and accessories to make the removal as steamlined as possible.
I started installing the scattershield backplate, the Sachs NFW1050 flywheel and the LS7 bearing. I'm ordering a BBC clutch today. People on the internet recommend having the flywheel and clutch balanced as a whole since I must removed the locating pins and make a combo that was not intended by the manufacturer. I'll ask shops around for a quote.
With the motor out I could finally check for something I feared would cause me headaches: the clutch linkage, and I haven't been disappointed....
I bought in advance the Scoggin Dickey clutch ball adapter for Corvette, and I have many problems with it.
First it does not locate the ball at the same place, below is a pic taken on my SBC, it might not be obvious because of the perspective (sorry, not much room to shot), but the bracket, which lines up vertically with the top hole (the one without the ball stud), pushes the stud further toward the front by approx. 1/2". I would need to test with the LS in the engine bay to confirm that, as I'm assuming the bellhousing ends up at the same location. Otherwise I'm in for much more troubles as I'd have to change the transmission mount.

Then, on the LS, the bracket just don't fit, there is a metal tag of the block poking out in the way. Seem like material to drill mounting hole in some configuration, still, cutting in the block is something I'll think about twice before doing.

Then, the piece de resistance of the whole ordeal is that the stock LS6 exhausts are totally in the way, mind you, the stud should be in the upper hole to be aligned with the frame side of the zbar mount.

Sooo, I'm at the crossroad of some significantly different scenarios:
1. I move from stock manifold, to header.
pros : more powaa, I keel my z-bar assembly as it.
cons: more $$$, I lose cool engine bay (in term of temperature) and the catalytic converter setup I aimed for.
2. I move from z-bar to hydraulic clutch.
pros : I keep at the exhaust setup I originally planned for.
cons : more $$$, more complicated setup, less direct connection with the drivetrain (a concept I like)
3. I get creative with the concept of Z bar.
As the zbar sits on two ball studs, it allows for significant amount of misalignement, add to that some custom frabrication (some sort of crank style cut out), I might be able to get around the exhaust.
pros: I change nothing, cheap
cons: some more fab.
In the case I'd go hydraulic, since I know my throw out bearing setup works, I was much more inclined to use a push style cylinder, as the scattershield has those mounting hole just above the fork.
Anyone know about those tabs? Were they intended for that, if so, is there existing setup you know would work?

Now, to finish on an high note, here's a view on my home made oil priming solution: took a M16 1.5 bolt, drilled and tapped, note the optional duct tape always on option.

Connected to my good ol' walmart garden pump. I pushed in the entire oil content, that should suffice.

I also indulge myself with some custom bracket for my d585 truck coil pack. I was rather inexpensive.
As I've switch sides with the fuel rail I have an interference with the coil, I'll probably cut the tab and try to bend the line away from the coil.

denpo
Carburated Nihilist
Moving forward!
I removed the flywheel locating pin, went to my buddy's shop and we dialed the pressure plate right in the center, drilled the 3 hole that were too small (BBC pressure plate with metric bolts) and drilled the pressure plate for the new location of the locating pin (sorry forget to take pic of the PP installed.

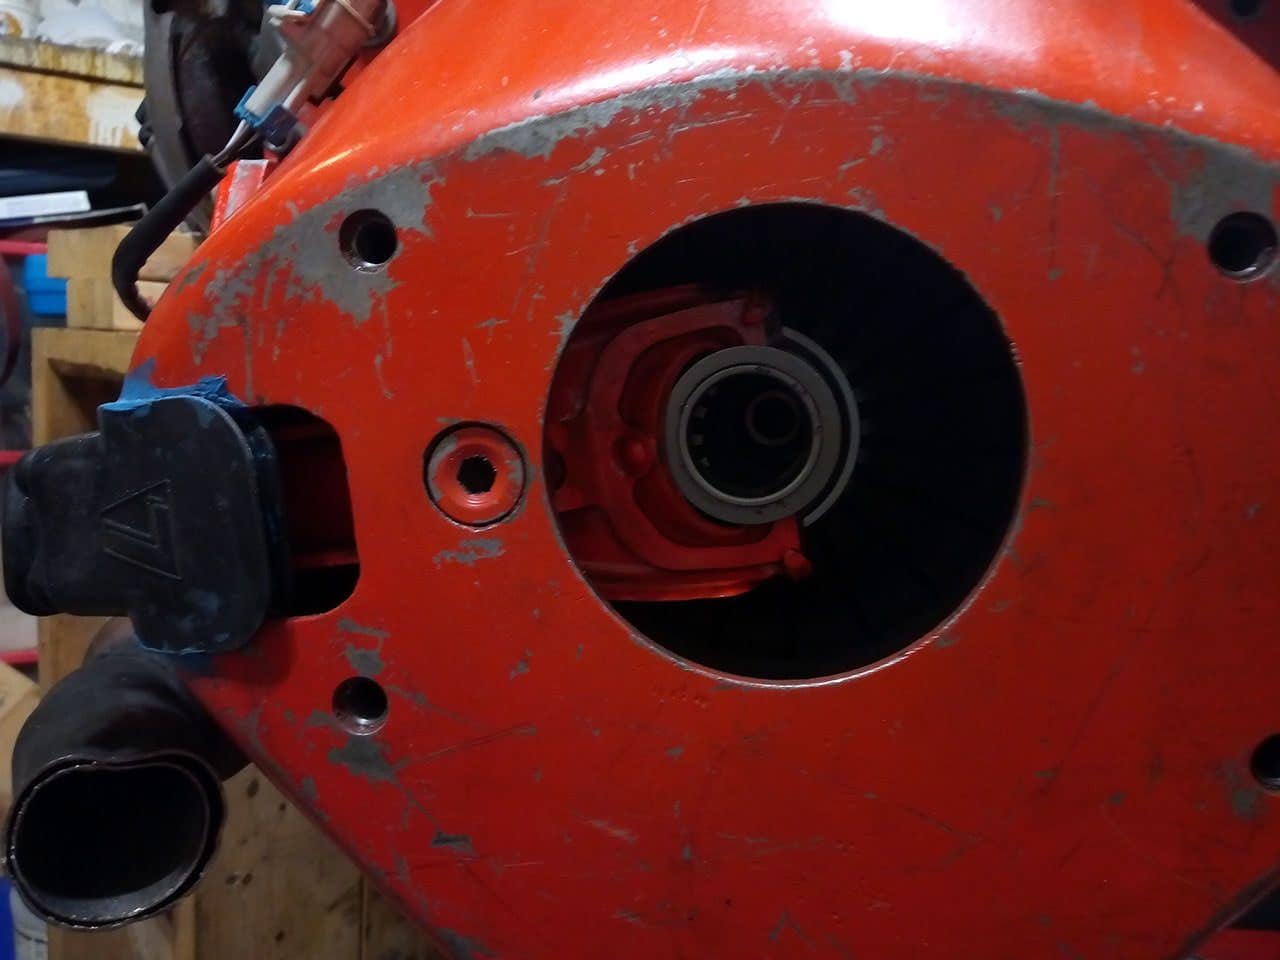
I made a bracket for the slave cylinder.
All seems fine, except that the slave cylinder has a spring in it, that makes it push all the time. So whatever position I set the adjustable fork pivot, it's always there to provide enough push for the throwout bearing to ride the pressure place.
Throw out bearing are not supposed to ride the PP all the time, aren't they?
Maybe the spring in the master cylinder, that actual act as a return spring will conteract this always pushing slave, once the circuit is devoid of air?


Tomorrow I got pick a clutch custom line as well as a -6AN adapter for the steering pump. I'm gonna test my theory.
I removed the flywheel locating pin, went to my buddy's shop and we dialed the pressure plate right in the center, drilled the 3 hole that were too small (BBC pressure plate with metric bolts) and drilled the pressure plate for the new location of the locating pin (sorry forget to take pic of the PP installed.


I made a bracket for the slave cylinder.
All seems fine, except that the slave cylinder has a spring in it, that makes it push all the time. So whatever position I set the adjustable fork pivot, it's always there to provide enough push for the throwout bearing to ride the pressure place.
Throw out bearing are not supposed to ride the PP all the time, aren't they?
Maybe the spring in the master cylinder, that actual act as a return spring will conteract this always pushing slave, once the circuit is devoid of air?


Tomorrow I got pick a clutch custom line as well as a -6AN adapter for the steering pump. I'm gonna test my theory.
I don't think you would want it riding against the PP fingers all the time, that would probably lead to noise, heat, and premature failure. The throwout bearing is typically supposed to sit back just a few thousandths from the pressure plate when the clutch is engaged.
denpo
Carburated Nihilist
Yep, that was my though. Just got the line, I'll see this evening if it fixes the issue.I don't think you would want it riding against the PP fingers all the time, that would probably lead to noise, heat, and premature failure. The throwout bearing is typically supposed to sit back just a few thousandths from the pressure plate when the clutch is engaged.
denpo
Carburated Nihilist
Afterall , all that slave cylinder was asking for was a return spring.

And that completes the engine side of the clutch actuation

Which allowed me to proceed forward with the installation of the T5.

Which make the engine pretty much complete.

This is the front side of the engine exhaust, crappy spot welded and heading to get TIGed.


And that completes the engine side of the clutch actuation

Which allowed me to proceed forward with the installation of the T5.

Which make the engine pretty much complete.

This is the front side of the engine exhaust, crappy spot welded and heading to get TIGed.

denpo
Carburated Nihilist
Ok, here's some updates, I'm moving ahead at good speed.
While I had the transmission out I though it would be a good time to take more picture of my Chevy WC trans mount.
Here you can see it's made form the original trans mount (it was for a TH350, not sure manual one are the same).
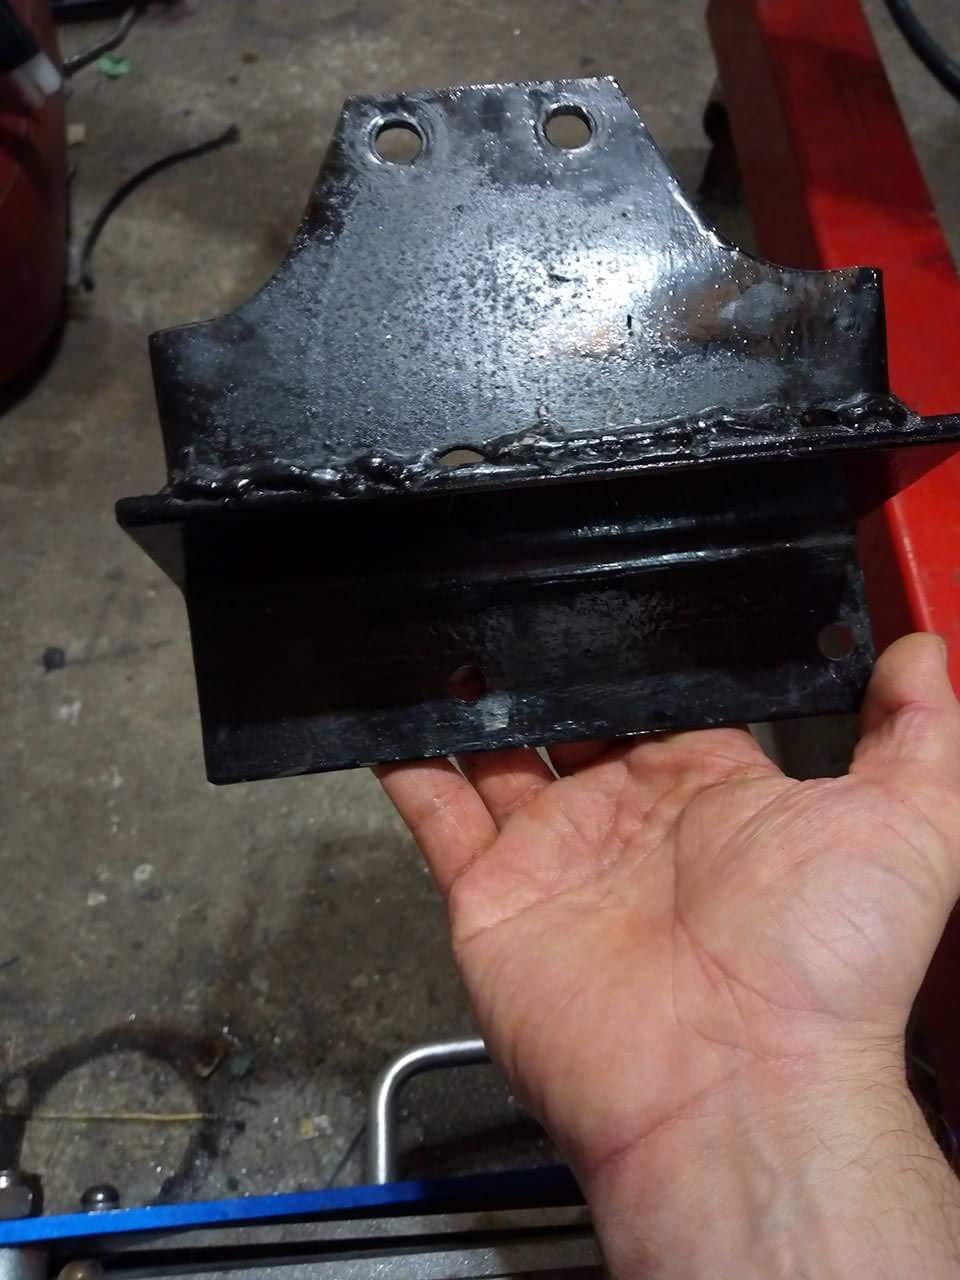
Here's how it fit with the other bracket, note how offset the holes are.

And that's the rear view of the bracket.

Then it was time for insertion. Boy that was a tense time, especially without helping hand.
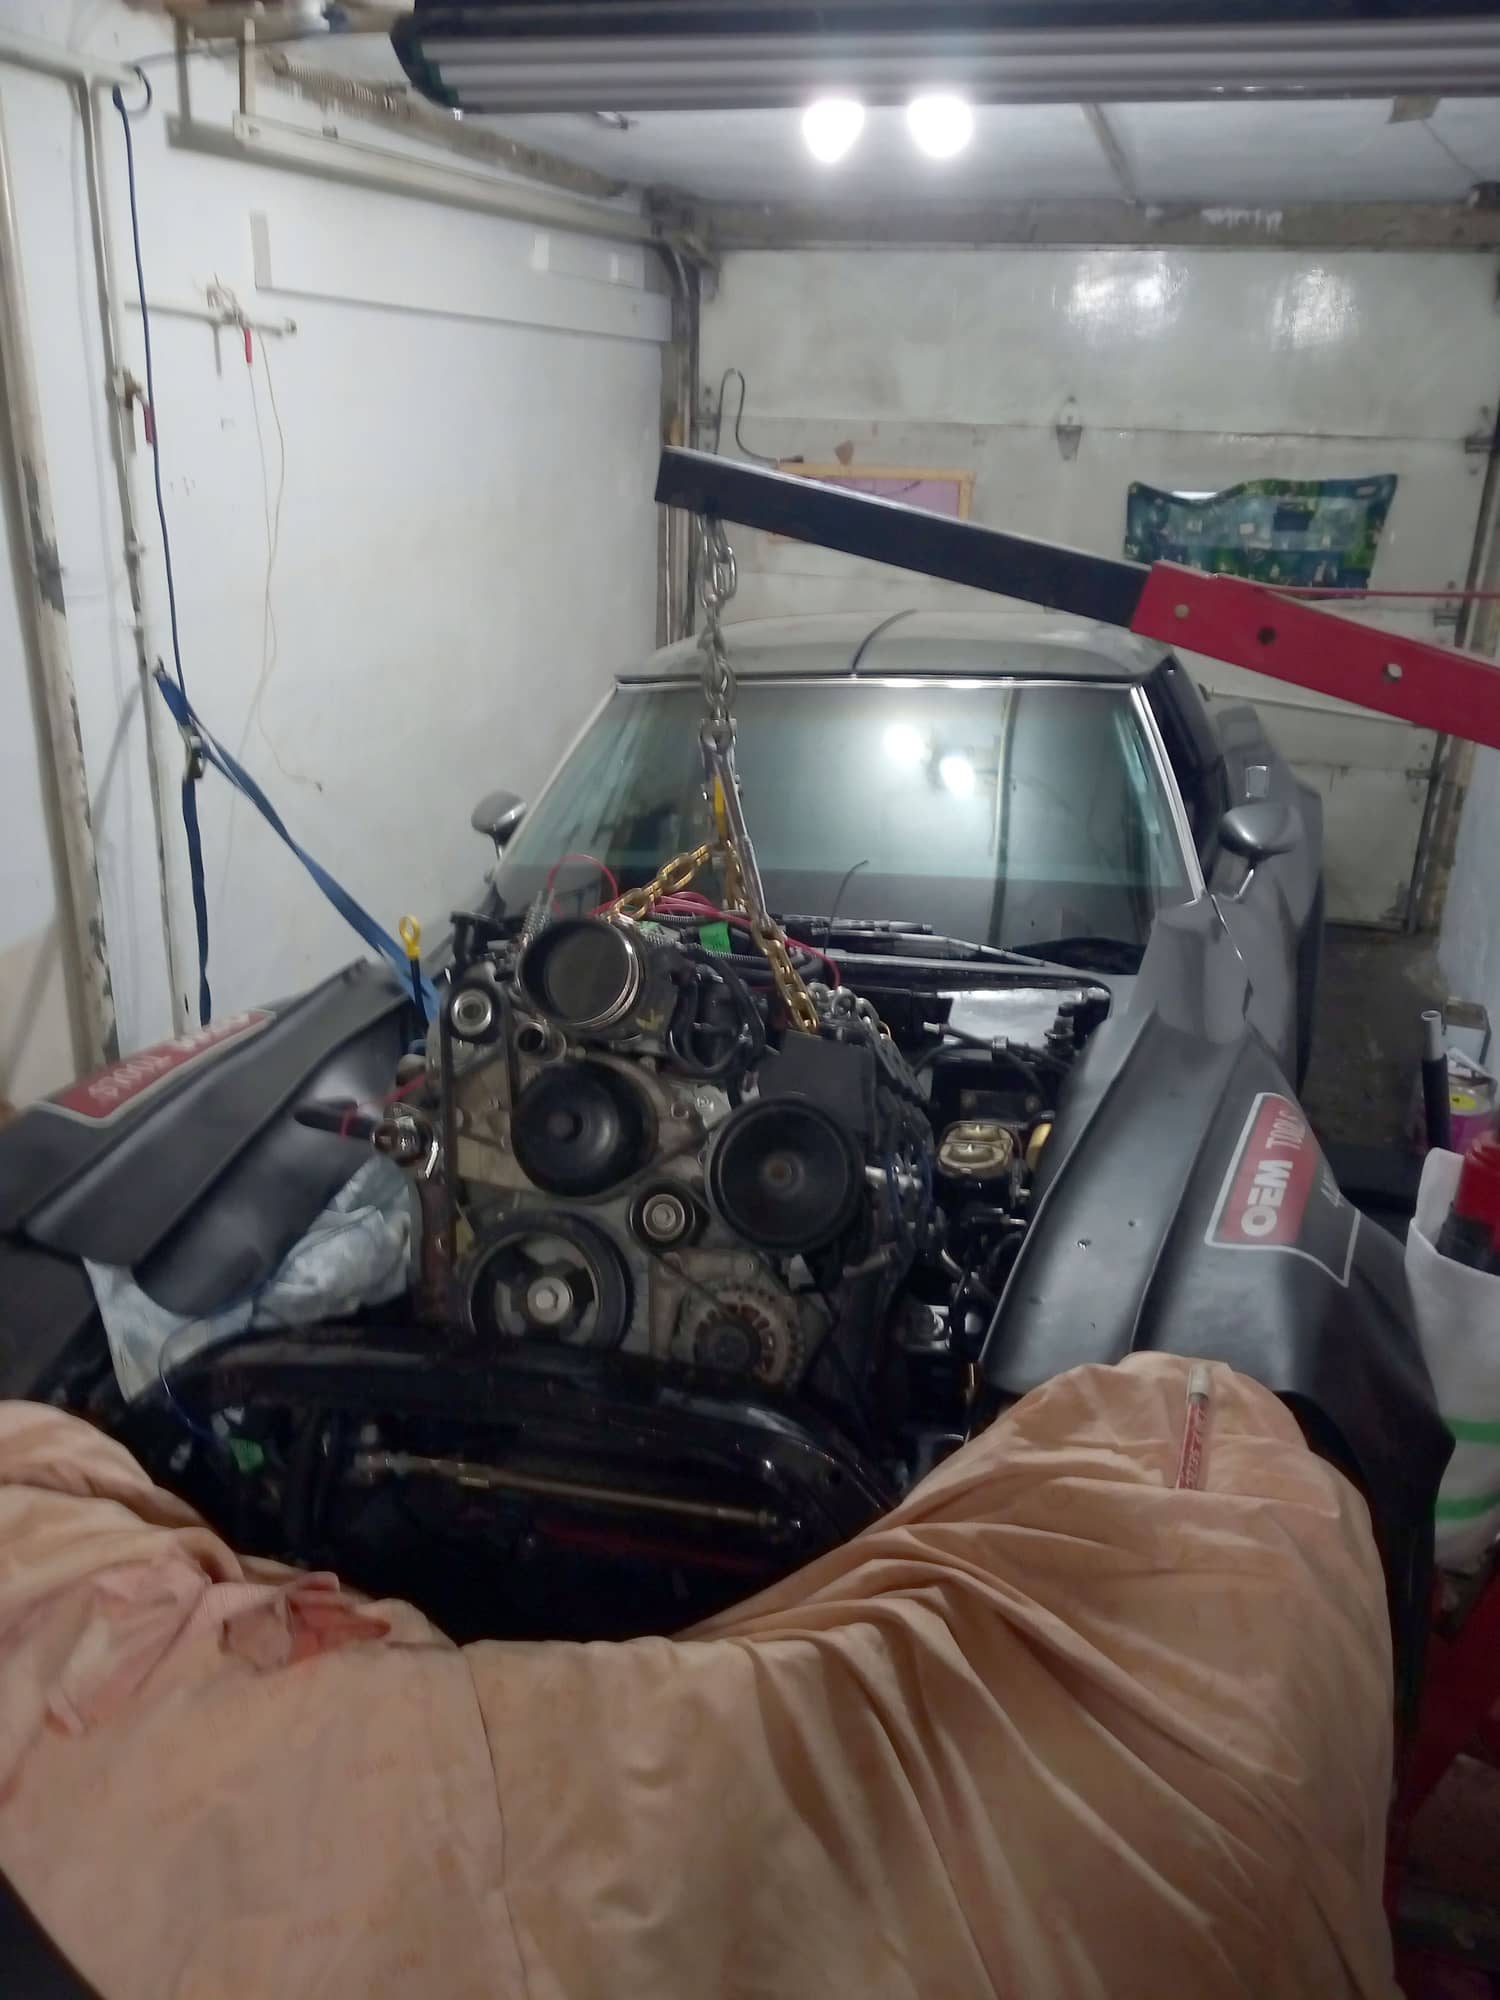
You'll not there how optimistic I was, with the exhaust manifold still on. I had to remove then eventually, but, hey at least I tried.
I expected the batwing oil pan to give me headaches, turned out pretty good.
All went well until I realize I had the wrong body mount. The one that reuse one of the LS body mount hole as the bottom SBC mount.

So My engine had to stay up in the air for a week until I get those.
They put the engine 1" back, putting it in the orignal SBC position, back-of-the-engine-wise.

Annnnd now it's in. phew.

I was time then to focus on the clutch master cylinder.
I made this adaptor, shamelessly inspired by post on the forum.
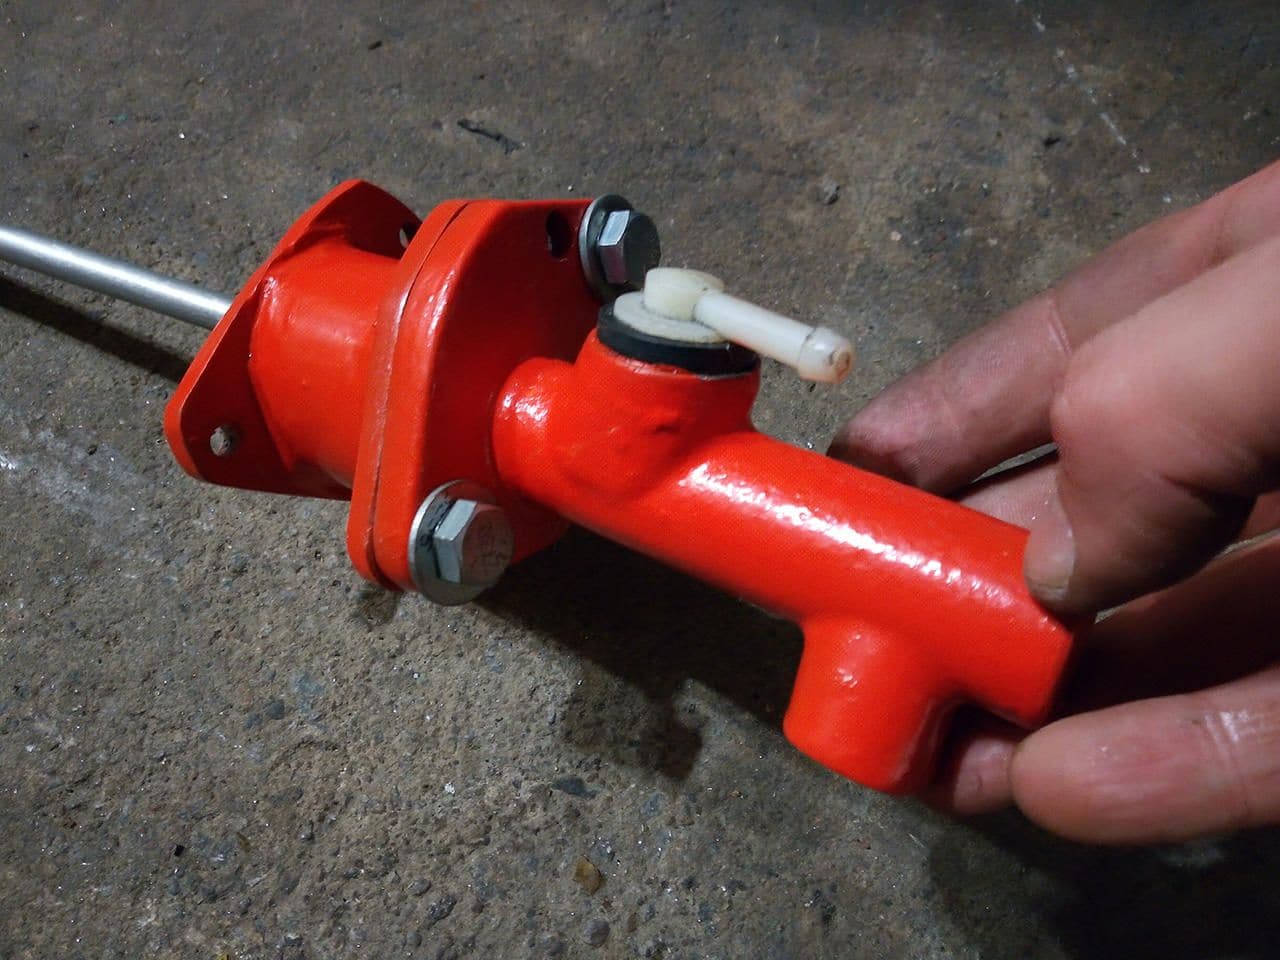
Turned out this was just the lenth I needed to not have to tweak the length of the push rod. Except for the hole diameter, some fill welding, a good grind and some drilling and now we have the correct hole size.

Here's the slave installed

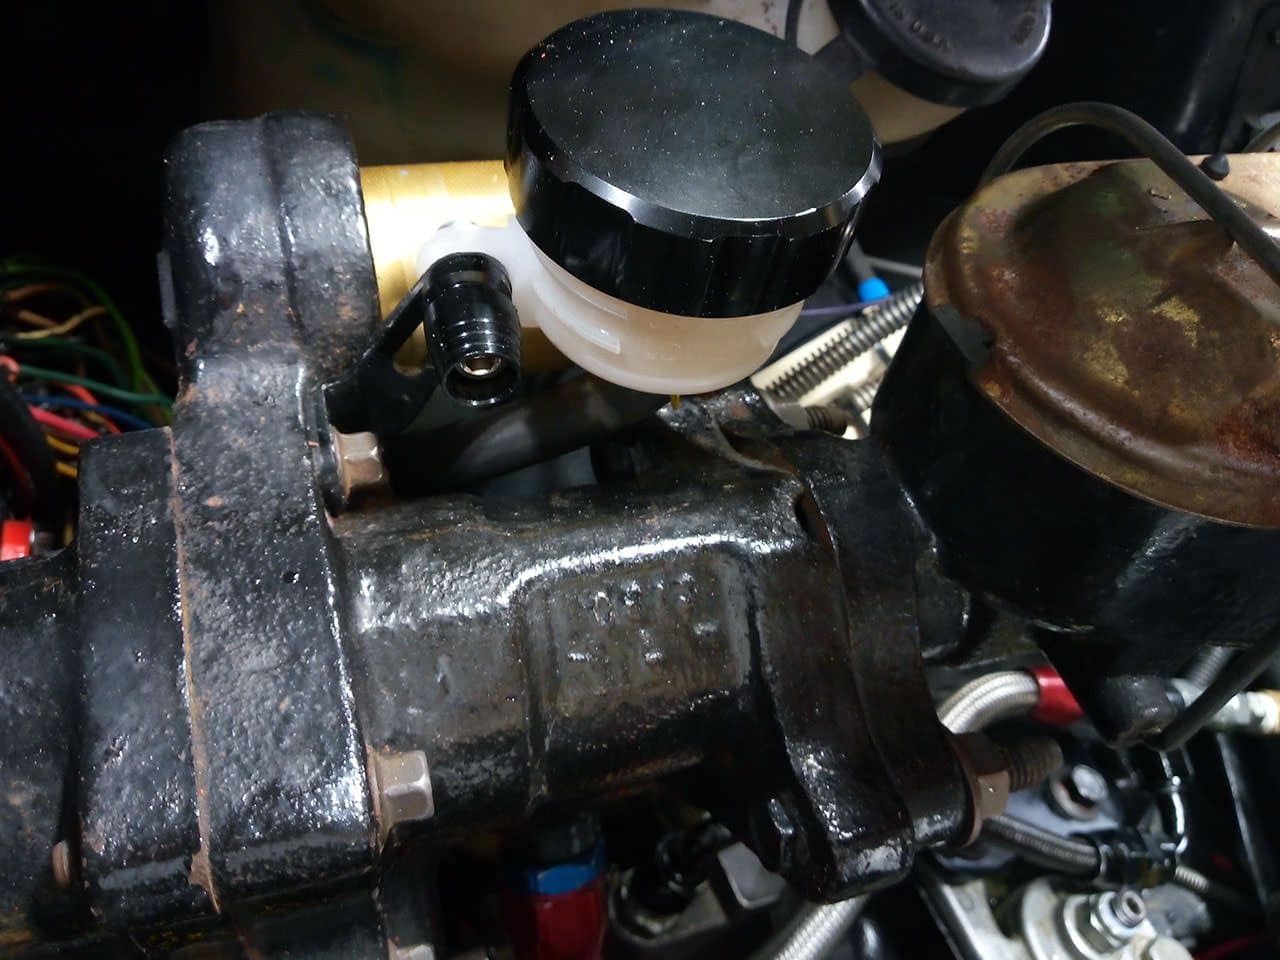
And the master.

And the reservoir sits nicely on top of the hydroboost.
Also done routing the power steering pump.
The line is against the head, I'm considering putting a fiberglass sleeve of the time.
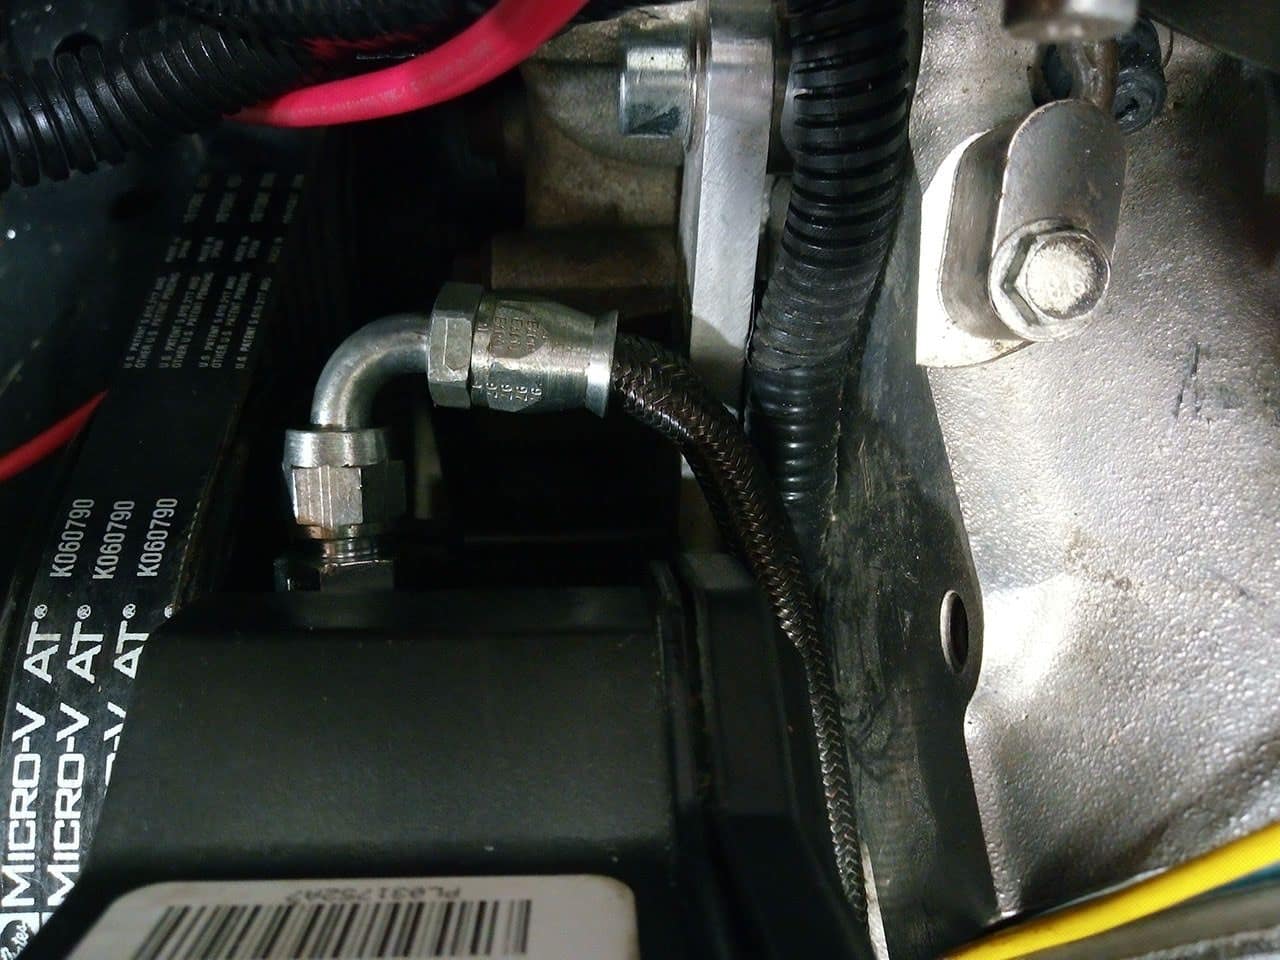
Yeah, the return side is quiet a collection of different fittings. I'll probably order a female -AN6 to nipple fitting to replace this.

Now I hit a major bump, the scrapyard fan just don't fit. they hit the control arm axes in not way I can cut them to fit. That's a bummer. I'm gonna have to find something else. Advises welcome.
Thanks for watching.
While I had the transmission out I though it would be a good time to take more picture of my Chevy WC trans mount.
Here you can see it's made form the original trans mount (it was for a TH350, not sure manual one are the same).

Here's how it fit with the other bracket, note how offset the holes are.

And that's the rear view of the bracket.

Then it was time for insertion. Boy that was a tense time, especially without helping hand.

You'll not there how optimistic I was, with the exhaust manifold still on. I had to remove then eventually, but, hey at least I tried.
I expected the batwing oil pan to give me headaches, turned out pretty good.
All went well until I realize I had the wrong body mount. The one that reuse one of the LS body mount hole as the bottom SBC mount.

So My engine had to stay up in the air for a week until I get those.
They put the engine 1" back, putting it in the orignal SBC position, back-of-the-engine-wise.

Annnnd now it's in. phew.

I was time then to focus on the clutch master cylinder.
I made this adaptor, shamelessly inspired by post on the forum.

Turned out this was just the lenth I needed to not have to tweak the length of the push rod. Except for the hole diameter, some fill welding, a good grind and some drilling and now we have the correct hole size.

Here's the slave installed

And the master.

And the reservoir sits nicely on top of the hydroboost.

Also done routing the power steering pump.
The line is against the head, I'm considering putting a fiberglass sleeve of the time.

Yeah, the return side is quiet a collection of different fittings. I'll probably order a female -AN6 to nipple fitting to replace this.

Now I hit a major bump, the scrapyard fan just don't fit. they hit the control arm axes in not way I can cut them to fit. That's a bummer. I'm gonna have to find something else. Advises welcome.
Thanks for watching.
vette427sbc
Well-known member
Nice progress :thumbs:
I like your slave cylinder bracket, looks stout! but why did you need the adapter for the clutch master cylinder? I assume thats the ~1985 chevy truck master?
I like your slave cylinder bracket, looks stout! but why did you need the adapter for the clutch master cylinder? I assume thats the ~1985 chevy truck master?
