You are using an out of date browser. It may not display this or other websites correctly.
You should upgrade or use an alternative browser.
You should upgrade or use an alternative browser.
My '76 restoration (long post)
- Thread starter denpo
- Start date
MYBAD79
Moderator
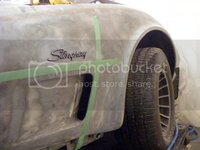
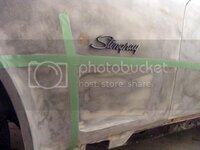
Do you have a compressor and paint gun? At this stage I like to seal that panel with epoxy primer and spray one coat urethane primer the next day.... Also, it looks like you used some relatively fine sandpaper; I prefer 80 grit on bare fiberglass and spray epoxy and then regular primer over the rough 80 grit for maximum "grip" :smash:
Might be overkill but so far never had a problem with this method.....
Might be overkill but so far never had a problem with this method.....
denpo
Carburated Nihilist
I have a small compressor (10 gallons), and a HVLP gun, but I"m really afraid to use them in the garage. It's no suburb here, at the slightest funny smell the whole neighborhood will jump on me.Do you have a compressor and paint gun? At this stage I like to seal that panel with epoxy primer and spray one coat urethane primer the next day.... Also, it looks like you used some relatively fine sandpaper; I prefer 80 grit on bare fiberglass and spray epoxy and then regular primer over the rough 80 grit for maximum "grip" :smash:
Might be overkill but so far never had a problem with this method.....
I never used them, but I guess they stink pretty bad right?
Concerning the sandpaper, that must be a trick of the light, because it's actually 80 grit on Durablocks I'm using. Maybe it's because I've wiped it with DX103, it tend to smooth the surface as it degrease it.
MYBAD79
Moderator
Spraying primer with low pressure shouldn't smell more than the fiberglass resin .... I'd give it a try but I wouldn't want to piss off the neighbors either.....
denpo
Carburated Nihilist
Ok you convinced me to do a test.Spraying primer with low pressure shouldn't smell more than the fiberglass resin .... I'd give it a try but I wouldn't want to piss off the neighbors either.....
Any recommendations regarding the epoxy and the urethane primer to use?
MYBAD79
Moderator
I've used PPG DP epoxy, awesome stuff but expensive. Recently I used SPI epoxy and WOW..... Now that stuff is great, it is even sandable (not reduced) unlike many other epoxies. If you reduce it you get a sealer that it not sandable.... Www.southernpolyurethanes.com
They have great high build urethane primer too.
I also like the PPG shopline urethane primer, but the SPI stuff is easier to order.... For that shopline stuff I have to drive across town and they don't sell online and don't ship....
They have great high build urethane primer too.
I also like the PPG shopline urethane primer, but the SPI stuff is easier to order.... For that shopline stuff I have to drive across town and they don't sell online and don't ship....
denpo
Carburated Nihilist
Thank you so much Karstern.I've used PPG DP epoxy, awesome stuff but expensive. Recently I used SPI epoxy and WOW..... Now that stuff is great, it is even sandable (not reduced) unlike many other epoxies. If you reduce it you get a sealer that it not sandable.... Www.southernpolyurethanes.com
They have great high build urethane primer too.
I also like the PPG shopline urethane primer, but the SPI stuff is easier to order.... For that shopline stuff I have to drive across town and they don't sell online and don't ship....
I have a PPG dealer in Montreal, I'll see how they're priced (probably unsanely). Plan B will be getting some SPI shipped at the border.
Will look into it.
In worst case, if it's too nasty I'll arrange to move the car to my buddy shop abd spread it there. If I can get those two layers spread by me I can do the following guide coat/finish sanding and save most of the whole bodywork price tag.:thumbs:
denpo
Carburated Nihilist
Tonight I test-installed the door weatherstrips I got from DrRebuilt (he is praised for the quality and fidelity of its rubber part).
I used some strip of double face tape to make it stay in place.
I was nervous, I've read so many horror stories about rubbers (from other vendors) not fitting and doors impossible to close.
Well, I'm please to tell you my passenger door closes just perfectly.
Locating the exact position of the door striker pin sure is a crap-shot for sure, but I ended with the right position after a dozen of attempts.
By feel I can tell it takes the right amount of slam to close the door, just like you'd expect.
Door is flush, but under tension it changes its geometry a bit. I will probably do one more mudding, since I have the shape to fit perfectly.
As soon as I can move the car on the other side, I will test the driver side.
It's a big relief, and a testimony I located the door correctly.
:thankyou::thankyou:
427Swede
Well-known member
Always looking forward to your project updates, nice work! It is something special about a car that is beeing prepared for paint, a promise of things to come:thumbs:
Perhaps you should let your new weather stripping sit still for a few days with the doors closed so it sets itself a bit?
Perhaps you should let your new weather stripping sit still for a few days with the doors closed so it sets itself a bit?
denpo
Carburated Nihilist
Thank 427swede. That's appreciated, coming from you it's an honor given the quality of your work.Always looking forward to your project updates, nice work! It is something special about a car that is beeing prepared for paint, a promise of things to come:thumbs:
Perhaps you should let your new weather stripping sit still for a few days with the doors closed so it sets itself a bit?
Absolutely, I'm probably gonna leave the weatherstrips here until paint time.
Last edited:
mrvette
Phantom of the Opera
Talk about funky smells, I tell you this is a true story.....
I was living on the second floor of a high rise, and the parking lot was right below my apartment, all I had to do was drop a cord out the door/balcony and work on a 14' sailboat, I put new mahogany rails on it, painted the hull but noticed the core of the hull was made of stupid balsa wood....which of course soaked up water, so not only heavy as hell, but affected hull integrity....soft floor....so out with the tools and cut out the inner hull, and remove all the rotten wood, so in with styrofoam, layer of cloth and epoxy.....then to put a layer of glass roving and heavy with Fiberglass resin, which of course stunk to holy hell, it was parked not so very far from the main air intake for the entire 500 unit building, so the smell of fiberglass resin went though the entire building and stayed noticeable for a WEEK......stunk people out, headaches, etc.....mgmt was nice to me over that one, BUT...:smash::smash::surrender:
I was living on the second floor of a high rise, and the parking lot was right below my apartment, all I had to do was drop a cord out the door/balcony and work on a 14' sailboat, I put new mahogany rails on it, painted the hull but noticed the core of the hull was made of stupid balsa wood....which of course soaked up water, so not only heavy as hell, but affected hull integrity....soft floor....so out with the tools and cut out the inner hull, and remove all the rotten wood, so in with styrofoam, layer of cloth and epoxy.....then to put a layer of glass roving and heavy with Fiberglass resin, which of course stunk to holy hell, it was parked not so very far from the main air intake for the entire 500 unit building, so the smell of fiberglass resin went though the entire building and stayed noticeable for a WEEK......stunk people out, headaches, etc.....mgmt was nice to me over that one, BUT...:smash::smash::surrender:
denpo
Carburated Nihilist
Talk about funky smells, I tell you this is a true story.....
I was living on the second floor of a high rise, and the parking lot was right below my apartment, all I had to do was drop a cord out the door/balcony and work on a 14' sailboat, I put new mahogany rails on it, painted the hull but noticed the core of the hull was made of stupid balsa wood....which of course soaked up water, so not only heavy as hell, but affected hull integrity....soft floor....so out with the tools and cut out the inner hull, and remove all the rotten wood, so in with styrofoam, layer of cloth and epoxy.....then to put a layer of glass roving and heavy with Fiberglass resin, which of course stunk to holy hell, it was parked not so very far from the main air intake for the entire 500 unit building, so the smell of fiberglass resin went though the entire building and stayed noticeable for a WEEK......stunk people out, headaches, etc.....mgmt was nice to me over that one, BUT...:smash::smash::surrender:
Why the hell do I have no difficulties believing you?
mrvette
Phantom of the Opera
Talk about funky smells, I tell you this is a true story.....
I was living on the second floor of a high rise, and the parking lot was right below my apartment, all I had to do was drop a cord out the door/balcony and work on a 14' sailboat, I put new mahogany rails on it, painted the hull but noticed the core of the hull was made of stupid balsa wood....which of course soaked up water, so not only heavy as hell, but affected hull integrity....soft floor....so out with the tools and cut out the inner hull, and remove all the rotten wood, so in with styrofoam, layer of cloth and epoxy.....then to put a layer of glass roving and heavy with Fiberglass resin, which of course stunk to holy hell, it was parked not so very far from the main air intake for the entire 500 unit building, so the smell of fiberglass resin went though the entire building and stayed noticeable for a WEEK......stunk people out, headaches, etc.....mgmt was nice to me over that one, BUT...:smash::smash::surrender:
Why the hell do I have no difficulties believing you?
HAD I known about the air intake in the parking garage, I could have moved the boat to the side lot or even the street for that matter, I not needing any electric tools to spread the soup around and let it cure....:smash:
phantomjock
Well-known member
Gene -
In today's world - Obozo's EPA would have you in court and "aggressively prosecute!"
Cheers - Jim
In today's world - Obozo's EPA would have you in court and "aggressively prosecute!"
Cheers - Jim
mrvette
Phantom of the Opera
Gene -
In today's world - Obozo's EPA would have you in court and "aggressively prosecute!"
Cheers - Jim
It's not much of a paint job, but I sprayed the primer and green color on the car some years ago, right here in the garage, wore a mask, fumes were bad, but the breeze blowing through helped a LOT....
:loveletter:
EPA be looking at a 12 ga 00 buck......eff em....top of the list of .gov agencies that need killing off.....and it's a LONG list....
:smash::thumbs:
denpo
Carburated Nihilist
denpo
Carburated Nihilist
All done, right?
Well, not so much.
Turns out my door didn't get misaligned, it's the striker pin that forces it downward. But the pin is already at its highest position.
Look like I'm gonna have to grin some metal to enlarge the window around the stricker pin backplate. *sight*
OTOH I found out realigning the door at that point is a breeze, the weatherstrip helps a lot. That's a good news, I'm more confident I can remove the door at paint time and recover the alignment afterward.
Actually the stricker pin alignment does a lot to the final door position.
denpo
Carburated Nihilist
I've been trying many thing to make my tail light special.
Afterall this is a very important detail as it may be the only thing many may see

So after all the led soldering, pcb hacking and such, I decided to start again from scratch.
The idea came for the little brainstorming I had will forum members about venting the rear bumper.
I watched a vid on the Challenger Hellcat, describing how they hollowed out one of the headlight to make room for supercharger intake that it all came clear to me.
I'm gonna do hollow taillights.


LED rings are of the 'COB' style, as smooth as CCFL rings, and damn luminous.
The support is gonna be aluminum, and there will be a grid in the middle.
Another pretty massive news : I managed to find the suspension kit of my dreams : double mount VBnP monospring, front AND back.
I wanted it before that, but when experienced it in real life in Karsten's car, I was sold.
And this just as I was about to install longer TA bolt and cut front coil to put the car at its final stance. How timely!
I feel like Xmass before Xmass. :yahoo:
Afterall this is a very important detail as it may be the only thing many may see

So after all the led soldering, pcb hacking and such, I decided to start again from scratch.
The idea came for the little brainstorming I had will forum members about venting the rear bumper.
I watched a vid on the Challenger Hellcat, describing how they hollowed out one of the headlight to make room for supercharger intake that it all came clear to me.
I'm gonna do hollow taillights.


LED rings are of the 'COB' style, as smooth as CCFL rings, and damn luminous.
The support is gonna be aluminum, and there will be a grid in the middle.
Another pretty massive news : I managed to find the suspension kit of my dreams : double mount VBnP monospring, front AND back.
I wanted it before that, but when experienced it in real life in Karsten's car, I was sold.
And this just as I was about to install longer TA bolt and cut front coil to put the car at its final stance. How timely!
I feel like Xmass before Xmass. :yahoo:
Last edited:
Kid Vette
Master-Baiter
I like it!
427Swede
Well-known member
That really feels like a new twist on rear lights!
With an aluminum net or grid in the center hole it will be awesome:thumbs:
With an aluminum net or grid in the center hole it will be awesome:thumbs:
Latest posts
-
-
-
-
-
Was member years ago dropping by to say hello.
- Latest: crazyhorse
-
-
-
-
-

