My '76 restoration (long post)

This weekend I had enough time to start porting my head.
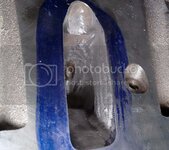
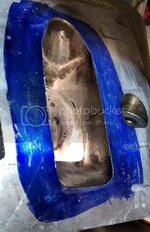
I could to the rough cut one one head, removing all 4 the rocker stud lumps and trimming the intake and exhaust valve guide bosses.
I'm leaving the swirl ramps alone as I want to keep low end torque.
It is a rather conservative porting.


I really appreciated my machinist's advice to often rub my burr into a block of hard soap to prevent aluminum from filling up the grooves. Worked like a charm, never had to clean it and garage now smell cheap chinese soap.:toothbrush:

headporting3_zps2efbeurl.jpg


headporting2_zpscgkrgmay.jpg


headporting1_zpskgls4hoj.jpg

headporting4_zpsa3vusj73.jpg


Valves also have been lapped.
 
30 + years ago i did a lot of porting started our doing my own but ended up doing it for other people. it was rewarding and fun. but i could never do it as a full time job. im thinking of doing another set for the corvette, i think it will be fun to see what i can do with a modern head. just making sure you do the same thing each time can be a challenge.
 
Here's some pic of my progress with head porting.

80-headporting6_zpstxbggmk0_9b7f35cde2f785ef36797fb7b62d34c1ca080215.jpg

I've cut the valve seat base to blend them with the runner.
This opens the intake port significantly.


80-headporting5_zpstqzkgezc_ae3175621684b0b14fb8c06c2b47dc962c905016.jpg


I've seen video were people grind the hell out of the valve guide, as you can see I'm pretty chicken about this, should I go ahead and trim it to a blade?


80-headporting8_zpsdwi1zoln_a584a8e736346e80d9d7184e962ee12940d71607.jpg


There you can see the rocker stud hole.


80-headporting7_zpszzblrbys_a3432b1e29021a86462dfffbce94c92050f1f066.jpg


I'm pretty much done with the cutting.

now it's time to make it smooth, smooth and shinny for the exhaust.

This weekend, with a weather almost back above freezing point, I could make a trip to the scrapyard.
There I found a 5.3 silverado without the frond fenders, how convenient!
It donated a throttle body, a MAF sensor, a belt tensioner, and most importantly a complete ECU/harness combo.
I already stripped it of the useless wires like AWD and auto trans.
I used this website as reference, very usefull.
I ran an post asking for windage tray nuts and lifter tray bolt, as they are a PITA to get in Canada, and finally and hopefully a fellow CF C5 member responded to the call.
I'd like to finish the other head and complete to motor so I can switch back to my final bodywork project.
I really needed to start this LS conversion for a change, but it's soon gonna be spray both time for the car. I still have 2 feet of ice and snow on the garage ramp as a excuse for now, but hopefully this won't last.
 
I'm moving nicely on the LS engine building, biting the cake there and there.

I got the oil pump installed. I used slices of thin plastic sheet to center the pump around the shaft.
I put a thin layer of gasket paste on each side of pump spacer around the oil port, bolts have blue thread locker, torqued to 18lb/ft.

80-oil_20pump_zps1jzkptph_b96c3fd8b0b7122396c20951589cedf21d0eec85.jpg


I ordered a set of cover alignment tool from SAC City corvette, as well as new seals. They are much cheaper than GM genuine tools and from the video seem to do the job.

I Received from fellow CF member onebithitter the windage tray nut and lifter tray bolts. Those are really special ones, and I was having a hell of time getting them from Napa Canada.

I did another run to the scrapyard to get all the little things like head coolant plug, a set of EV1 injector pigtail, and LS6 type steam coolant cross line (2 plug in the back and a single crossing line at the front. At first I tried reusing EV1 connectors form an old LT1 harness I had, but I realized with time wires had gone bad and when I tried to solder them I got crappy results. Too bad they had that nice looking rubber boot.

-I also ordered a LS6 type valley cover, so I can run the PCV system like a LS6. My block being a late GenIII, I don't even have to do any cutting in the block's valley.
-I've done a good bit of the truck harness conversion, got the layout right, all connector wires shortened or lengthened, now I need to deal with the grounds and power sources.

-I learned for Gary86's post on an other forum that there is a simple and inexpensive recipe for mating and LS engine to a Gen I transmission like my T5, it's the sachs 1050, a flywheel make for (amongst others) the 2005 silverado 3500. It has the correct thickness. I've found the best explanation here, although they fail to mention a 70$ stock flywheel can to the job.

I'd like to share a couple of links that pack great information when you start digging into LS engine world.

This video does a great job explaining all the difference in connectors type and location along the years of the Gen III/VI/V SBC.
[ame]http://www.youtube.com/watch?v=lx9nW1TJDCM[/ame]

This guy made an entire playlist on how to port your LS heads, I did refer to them frequently when porting my heads.
How to LS1 DIY head porting.

Here's were I got info on the LS1-LS6 valley cover conversion:
http://ls1howto.com/index.php?article=18
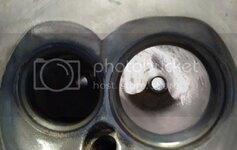
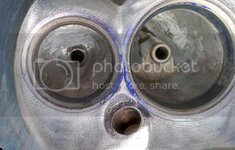
 
i think they have the intake guide shaped like that to create swirl, but i think it would help to smooth it out a little. airflow doesn't like change so anything to minimize change is generally good.
 
I'm updating later than I thought, because I've been victim of the postal system gremlins.
The cover alignment tools I ordered bounced twice between LA and Montreal. It took almonst a month to arrive.
That what a bit frustrating, but at the same time it left me more time to finish the head porting.
Once the tools received, I could properly install the covers, with new seal. Then came the oil pan.
I did a second valve lapping to make sure I didn't damage anything during porting. Hopefully I didn't.
New valve seal, new blue LS3 springs.
I installed the head with ARP studs.
With some layout fluid I checked were the rockers are rubbing the valve tips and looks like those LS6 pushrod will do the job.

And here we are now :

80-engine_20rebuilt_zpsior0qn88_763430323ef3c1986b78da217625463c628e858a.jpg


I'm close to a wrap, The engine may not run before months, but at least I know all is back together and nothing will get lost.
It remove also a lot a clutter in the garage.
 
More pic of the engine :

80-valves_zpsrrdk1o5b_f5765b6369eb5a9544cdbc8babcd140e9f756ac1.jpg


here's how I've bent the front steam cross line to accommodate the LS6 PCV output.
80-steam_20line_zpsspca5rqq_2bcbf84d9b8ce533713accaf04f8eb4201459d3f.jpg


On the back, just plugs
80-steam_20line2_zpspwtnhhbq_9f5fa9ca44f9e2b9320e52b41f28f4f15e3837f1.jpg


I also took the time to assemble my gas pump adapter line.
80-gas_20pump_zpsegzoqh0z_3282d36ce8a9a5cce8c10020405674e5ae8689ba.jpg


Finally, some pic the ongoing throttle body porting :
80-throttle_20body_20porting2_zpsidigydno_62bc20bd357e7ce0fb15b6298c85b8c332e16b2c.jpg


I used epoxy mixed with the residue of the head porting.
Since I used hard soap while grinding (to prevent burr jamming), I washed the powder in with hot water.


80-throttle_20body_20porting3_zpshxb1p8re_76faa10dfd1f081da92ea73ff1d349d4d7b8f84b.jpg


I took a different approach with the idle valve port, instead of putting a facing hole, it's a side hole.
I used play doh to preserve the holes.


80-throttle_20body_20porting5_zpsjkvwkegt_d7e008cd683f7cda91137234aa9c2bcff3fa966a.jpg


Yep, those are holes.

80-throttle_20body_20porting4_zpsa8x7cpno_e8db4a38446561c1f6230d976128a79971c41680.jpg


I will have to beef up this area from outside.

80-throttle_20body_20porting1_zpsw9orxzfu_86026460b206270f915d574a494961d9ee6db3bf.jpg
 
Hey Denis, it's been a long time since I had a look at your thread (March 2014), and there's been a lot of progress! Awesome work all around. I'll be sure to check in more often. This car will definitely turn heads once it's done!

Hopefully you didn't make it too wide and too low to get through your garage door and over your driveway hump?

Not sure if it was properly depicted, but Denis is doing all this in a basement single-car garage that is barely wider than the car. It's really quite remarkable that he's gotten so much work done on his own in such a confined space.
Hi Phil, it's been a while indeed.
Thanks for the motivational booster shot.
By the way, do you know a good painter around MTL? I'm about to start asking for estimates, because you know, there's limit to what I can do in that small space.
While I'm confident the flares will make it, I will have to watch closely how the front spoiler like the ramp.... :twitch:

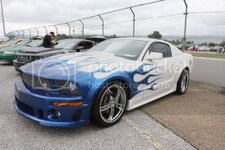
If you're willing to travel out of the city, there is Auto Design in St-Jean-sur-Richelieu that does amazing work. They painted (twice now) my friend Luc Chevalier's Mustang in pearl white with blue flames:a_64.jpg
After seeing his car, I had them do some small work on my Cobra as well. The results have held up well for the last 6-7 years now. Give them a call, they're not great at responding to emails.
 
Ok, here we go :

Beyond the point of no return II
" Holez in da hood"

80-scoop1_zpseuczxvwt_8601f31a8cb31dc774db54fc7cc9d797d500d60f.jpg


80-scoop2_zpsmwx3sur4_e00aa9b9d72dfe5056ded4a7d22d165c2d338c93.jpg


80-scoop4_zpsbjehqlfy_0831fcfa08f1cd489d73ac336c33db77a4344f63.jpg


80-scoop3_zpsa9xbgy2y_d94c253c280c35d9f97af40b19263607c41ed2e1.jpg


I haven't post for a while because of this mod.
It's the very last line of my dream list, and for a profesionnal procrastinator like me, obviously the one you have to kick your butt to get done.
But if only it was that simple.
The mod started back in the middle of the winter, when I tried casting a mold of the LT-1 hood of my buddy Michel.
Long story short, it's been an almost complete disaster. The mold didn't released properly, hopefully no damage done to Michel's hood beyond some stolen paint. For those who knows Michel's build, you'd know it's no big deal.
So I ended up with a sorry broken mold. I tried to fix the most of the cracked gelcoat and proceed to cast something in it.
Long story short again, it was an obvious second disaster, but this time it was expected, given the state of the mold.
Then I proceed to fix what came out of the mold, straightening, reshaping.
Even with all the hard work, I decided to retain as little as possible from the molded part.
After that it took me a while before jumping in, because it's about cutting big holes in a perfectly fine hood to glass in stuff of shaddy origins.
I didn't post about that because I didn't know if it wasn't going to be a dead end.
But now it's done, no turning back.
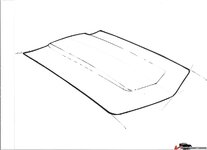
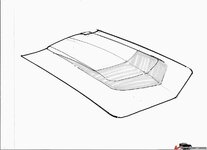
As you can see I've been doodling some ideas on the hood, but for now the plan is to make is look like this (minus the two longitudinal fins).
Three blades, and some hexagonal mesh in the bottom.


80-blue_mercedes_benz_slr_gloss_black_hood_louvers_cba45309f0494244ee8721d216634267c2e444ae.jpg
 
Looks similar to something I was thinking about:
I can't be completely wrong then :amused:.
The fact the LT-1 scoop is wider than the hood hump bugged me for a while, but in the end I decide to embrace it.
I'm still not sure how I will "blend" it in, actually I'm thinking about not blending it and cutting them short deliberately.
We'll see.
 
Denpo, your ideas are pretty good in my opinion... I like it, I like it... I am going to create a custom dash but I am still thinking of what I want... Then I need to learn how to work with fiberglass... Ha ha ha... I did find some good articles on the web so first thing first. Got to get the engine and suspension back in and then Ill start working on the dash.
 
There is an outfit in California that has some ready made parts similar. I've asked for details on size and materials - haven't heard back yet. Expect might be ABS.
12695551db558f3ac.jpg

Looks nice - may fill your requirement. But your design is sharp!

Cheers - Jim
 

Latest posts

Back
Top