Weight reduction: Running out of ideas.

Diy - Ruggles Scales

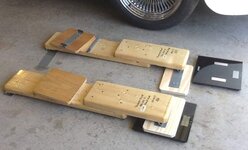
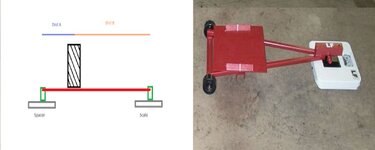
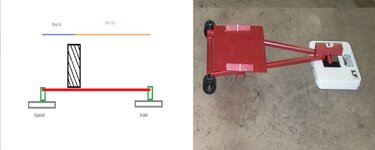
I bet for the tank of fuel and the trip over to Topeka, you could whip up a set of Ruggles Scales:
12695bdb39427fcbe.jpg

Or just make one and block the other 3 wheels to same height and get your corner weights using just one.

This from the Factory Five Forum:
The theory is that on a level surface with a spacer the same height as the bathroom scale, the ratio of total distance over distance A is your multiplication factor for what your scale reads. [(A + B) / A] = Multiplication Factor
Ex: If distance A is 30 and distance B is 30 (half way between the spacer and scale): (30 + 30) / 30 = 2, so you multiply what your scale says by 2 to get the actual value.

If you want to use a 200lb bathroom scale to weight something with a max weight of 2000lbs, you just need a long bridge between the two plates and set your pivot point with distance A being 1/10th of A + B.

Things to keep in mind:
You need a stable structure with everything level. Its also hard to balance a tire, attached to a car of course, without at least two connecting rods for the tire to sit in. In the idealized form, you would use the centerline of the tire as the distance point, but in reality since the scale side is moving it shifts the contact patch and I dont know if this will change readings since a tire is flexible. For reasonable distances, a reading on the scale with the weight fixed at the inside of the tire vs outside of the tire would cause a huge change.

Your error factor gets multiplied as well. The scale you are referencing says withing .2lbs, which i'm taking to mean +- 0.1lb. If you were to use a 1:10 arm ratio, that error factor gets multiplied by the same value to become +-1lb.


Timber version:

12695bdb3b4467780.jpg

Cheers - Jim
 
Last edited:
I bet for the tank of fuel and the trip over to Topeka, you could whip up a set of Ruggles Scales:

12695bdb39427fcbe.jpg

Or just make one and block the other 3 wheels to same height and get your corner weights using just one.

This from the Factory Five Forum:
The theory is that on a level surface with a spacer the same height as the bathroom scale, the ratio of total distance over distance A is your multiplication factor for what your scale reads. [(A + B) / A] = Multiplication Factor
Ex: If distance A is 30 and distance B is 30 (half way between the spacer and scale): (30 + 30) / 30 = 2, so you multiply what your scale says by 2 to get the actual value.

If you want to use a 200lb bathroom scale to weight something with a max weight of 2000lbs, you just need a long bridge between the two plates and set your pivot point with distance A being 1/10th of A + B.

Things to keep in mind:
You need a stable structure with everything level. Its also hard to balance a tire, attached to a car of course, without at least two connecting rods for the tire to sit in. In the idealized form, you would use the centerline of the tire as the distance point, but in reality since the scale side is moving it shifts the contact patch and I dont know if this will change readings since a tire is flexible. For reasonable distances, a reading on the scale with the weight fixed at the inside of the tire vs outside of the tire would cause a huge change.

Your error factor gets multiplied as well. The scale you are referencing says withing .2lbs, which i'm taking to mean +- 0.1lb. If you were to use a 1:10 arm ratio, that error factor gets multiplied by the same value to become +-1lb.


........................

Cheers - Jim

I built a couple of those thingies several years ago (in a March 2011 thread here). I haven't done much with them, as it's rather time consuming getting all four tires at the same level. I might blow the dust off them sometime over the winter and check out the left/right front axle weight distribution (while playing with the rear spring bolts), as I already have a decent feel for what the front/rear distribution is.
 
Didn't you put type II pump in a while back? I have an aluminum type II with V-belt drive. Pulley is from CP. Don't know if serpentine shaft would accept it or not.
 
Didn't you put type II pump in a while back? I have an aluminum type II with V-belt drive. Pulley is from CP. Don't know if serpentine shaft would accept it or not.

I believe it is a type II pump. It's off an '89 Pontiac with R&P steering. I got it originally because it was half the weight (6 vs 12#) of the stock '69 pump, had a V-pulley, and was rack compatible (pressure wise).

The aluminum pumps I'm seeing on some junk cars resemble the shape/design of my current steel/iron pump. However, they all have serpentine style pulleys, hence my need to swap out the pulley somehow. If the price is right I might just pick up a used aluminum pump, and then figure out what I have to do to convert it to V-belt configuration.
 
Ford used an aluminum pump in the 80's on some cars. That was probably a V belt pump. I'll see if I can find a picture.

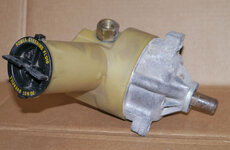
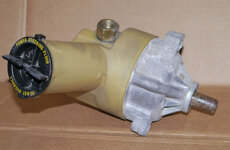
EDIT: This is a Ford C-II (or C2) pump with a press on pulley. Press-on V belt pulleys are available for this through Summit. I have one of these, unknown condition, if you want it.

45bdc2954073f5.jpg
 
Last edited:
Ford used an aluminum pump in the 80's on some cars. That was probably a V belt pump. I'll see if I can find a picture.

EDIT: This is a Ford C-II (or C2) pump with a press on pulley. Press-on V belt pulleys are available for this through Summit. I have one of these, unknown condition, if you want it.

45bdc2954073f5.jpg

I appreciate the offer. I'm planning on hitting the junkyard this afternoon, and I'll look for a similar one to get some measurements to see if that pump would fit. Due to packaging issues (pulley plane/depth, left UCA clearance, and the steering link to the rack), I need a somewhat shallow (front to rear) pump.

I'll do some figuring and get back to you. Thanks again.

ps: I'll admit to the collective I don't know what defines a pump as a type II unit/design. I'd appreciate anyone's input here. Thanks.
 
Sorry I'm late for your treasure hunt.

The Saginaw TC series is call the type II or type 2. Basically they replaced the pump series Chevy put on your car in St. Louis. You can find 'em at Summit. Summit will also have V-belt pulleys. The pumps can have an aluminum body and be used with a remote reservoir or with a integral plastic tank. They had some early reliability problems with C5 track day cars so the Z06 got the cooler.
 
Larry, I spent a couple hours out in the fresh air this afternoon, perusing one of my favorite junkyards. I looked at a couple Fords and took some measurements of that Ford pump, and unfortunately it is too long to fit in front of the engine (I don't have room to move it outward and back to get the pulley in the right plane). I do greatly appreciate your generosity, though. Thank you.

After a bunch of searching I did find an aluminum pump that had the fluid ports in the "right" locations and the integral reservoir on the outer (left) side. I try my best to use GM parts when I can (just loyalty to an old employer, I guess), but I didn't find any that would work (ie: package well). The pump I picked up was off a 2002(?) Jeep. I put it on my scale in the garage and it is about 30% lighter (4.2# vs 6#). This pump has a pressed on aluminum serpentine type pulley, but the pulley bore looks to be similar to the pulley on my current pump, so I'm going to try to see if I can just transplant my old pulley onto this pump. The serpentine pulley has access holes in it to get a socket in there to tighten the attachment bolts, so I might see if I can drill a couple similar access holes in the present pulley, and hopefully do it without bending the pulley or messing up the balance. I might also be able to reuse my high pressure line, as the port threads look to be similar.
 
More time at the junkyard

I spent a couple hours scouring a local junkyard again for parts and ideas. I found a lighter/thinner radiator that might package with a few mods in the stock location. This radiator has similar cross sectional area to my present (excellent performing) DeWitts radiator, but thinner. I'm just trying an experiment to see if I can remove some more front end weight by carrying around less water in the radiator. I just have to do some more thinking before I actually spend the money for the part.

While I was wandering around the place I stumbled upon a couple of early/mid 2000's Chevy Impala/Malibu cars that had the engine/suspension cradle removed from the car. I didn't have my magnet with me, but it sure looked like aluminum (and sounded like aluminum when I tapped on it). I've been gun shy about welding up an aluminum front suspension crossmember, but these cradles I saw were using thinner material than I was planning on using for my design (and, I'm not setting the engine and transmission weight on my crossmember). I think I'll do a little more serious thinking on welding up an aluminum crossmember this winter.
 
Aluminum front suspension crossmember

I "spec'd out" some aluminum tubing (square and rectangular) to build a replacement front crossmember. With quarter inch walls on the pieces, the tensile (and post-weld) strength of the pieces calculate out to a number that should give an overbuilt/safety margin of around 10x. The material weight calculations come out to slightly less than 21 pounds (versus 35# for my present steel crossmember). With this much difference in weight, I could add a few more pounds in gusseting, and still end up with a piece that is lighter than the present piece and that doesn't cause me safety concerns every time I go out on the track.

The material costs don't appear to be too outrageous, but the shipping costs on the longer pieces does boost the cost noticeably. I need to keep looking around to see if I can keep the total cost withing reason.

Mike, Do you have a Metals Supermarket in your area? That's where I buy anything over 8ft.

Anything under 8ft I buy from Mcmaster Carr. I don't know how they do it but their shipping for long stuff like that is a fraction of what I get charged for shipping something that long. And, I usually have it the next day. You can call them and get shipping rates.
 
I "spec'd out" some aluminum tubing (square and rectangular) to build a replacement front crossmember. With quarter inch walls on the pieces, the tensile (and post-weld) strength of the pieces calculate out to a number that should give an overbuilt/safety margin of around 10x. The material weight calculations come out to slightly less than 21 pounds (versus 35# for my present steel crossmember). With this much difference in weight, I could add a few more pounds in gusseting, and still end up with a piece that is lighter than the present piece and that doesn't cause me safety concerns every time I go out on the track.

The material costs don't appear to be too outrageous, but the shipping costs on the longer pieces does boost the cost noticeably. I need to keep looking around to see if I can keep the total cost withing reason.

Mike, Do you have a Metals Supermarket in your area? That's where I buy anything over 8ft. I just googled those guys. A few of them in surrounding states, but none near where I'm at.
Anything under 8ft I buy from Mcmaster Carr. I don't know how they do it but their shipping for long stuff like that is a fraction of what I get charged for shipping something that long. And, I usually have it the next day. You can call them and get shipping rates.

I've ordered a bunch of stuff from McMaster Carr over the years, but I never thought about them when it comes to metal material. I'll get on their site and see what they got.

I appreciate it.
:thumbs:
 
I finally got the "new" aluminum p/s pump modified and ready to put on the car. I had to pull off the serpentine pulley (a damn shame, as it was a nice lightweight plastic piece) and replace it with the slightly heavier steel v-pulley off my previous steel pump. I managed to somewhat compensate for the heavier steel pulley by installing the smaller volume, lighter reservoir off the steel pump (the bigger reservoir wouldn't fit in the location anyway). I also trimmed a few unnecessary ounces off the aluminum bracket for the pump.

The "old" pump was about 6# even, and the "new" pump combination is 4.7#. Not a lot of difference, but I'm pretty much working with crumbs on the weight reductions anymore. I'm installing a C5Z p/s fluid cooler (11 oz) and the attending lines while I've got things apart, so I should still be able to get this done with a minimal weight penalty.
 
Aluminum clutch linkage bellcrank/Z bar

In the occasional break from being tied up doing holiday stuff (and awaiting getting to finish the aluminum p/s pump and cooler install), I've been knocking around some ideas on replacing the current clutch Z bar with an aluminum lookalike. The spare bar I've got laying around is about 2.5# (39.3 oz), so perhaps I could take a touch of weight off by fabricating it in aluminum. The shape is certainly easy enough to duplicate if I make a temporary jig, and the right hand side that slides onto the ball stud screwed into the block is easy enough to make, but the left hand side that has the captured ball stud will take some thinking or searching (I'm looking to see what McMaster-Carr might have to offer).

I don't have an accurate feel (yet) for what the forces are on the bar arms (and the resulting torque in the tube between the arms), so I need to figure out if I can measure the actual forces, or just make a SWAG and then compare that to the tensile strength of the aluminum. I'm tied up doing a lot of family stuff this week, so I've got plenty of time to do some daydreaming to come up with some thoughts on this.
 
Mike, Don't remember if I brought this up before but, how about replacing the rear view mirror (that has a heavy pot metal bracket) with a modern mirror (glued to the glass). I bet that mirror/bracket is over a pound and would be an easy swap.

OR, you could do what this guy does:

[ame="https://www.youtube.com/watch?v=AjGXn249Fc0"]https://www.youtube.com/watch?v=AjGXn249Fc0[/ame]
 
Mike, Don't remember if I brought this up before but, how about replacing the rear view mirror (that has a heavy pot metal bracket) with a modern mirror (glued to the glass). I bet that mirror/bracket is over a pound and would be an easy swap.

OR, you could do what this guy does:

https://www.youtube.com/watch?v=AjGXn249Fc0

I've remembered your mirror suggestion, and that is still on my watch list of junkyard parts. IIRC, I confessed my lack of knowledge on how to "unglue" the mirror from the donor car windshield.

I remember that scene from the movie. :amused:
 
I think most of the early ones have a metal piece that is glued to the widshield that has a dovetail. The shoe of the mirror slides on and a set screw locks it in place. Not sure but I think you can buy a kit that has the metal piece and adhesive so all you really need is the mirror.

This one includes the mirror, mounting bracket and adhesive for $14: Pilot Automotive Universal 8" Black Day Night Windshield Rear View Mirror
 
In the occasional break from being tied up doing holiday stuff (and awaiting getting to finish the aluminum p/s pump and cooler install), I've been knocking around some ideas on replacing the current clutch Z bar with an aluminum lookalike. The spare bar I've got laying around is about 2.5# (39.3 oz), so perhaps I could take a touch of weight off by fabricating it in aluminum. The shape is certainly easy enough to duplicate if I make a temporary jig, and the right hand side that slides onto the ball stud screwed into the block is easy enough to make, but the left hand side that has the captured ball stud will take some thinking or searching (I'm looking to see what McMaster-Carr might have to offer).

I don't have an accurate feel (yet) for what the forces are on the bar arms (and the resulting torque in the tube between the arms), so I need to figure out if I can measure the actual forces, or just make a SWAG and then compare that to the tensile strength of the aluminum. I'm tied up doing a lot of family stuff this week, so I've got plenty of time to do some daydreaming to come up with some thoughts on this.

Just my opinion on this... I would be nervous about the aluminum fatiguing with the constant leverage/twisting forces on each "arm" if the design was mimicked to the factory piece. Im thinking make the arms wide enough to drill the cross shaft so that the arm can be welded 360* to the tube. OR a factory looking piece could be made from chromoly but with much thinner material?
 
Z bar in 6061 sounds reasonable. A little (very little) more deflection because of the lower modulus of elasticity but strength is similar to mild steel original. Might sleeve the linkage bar bearing surfaces with a sacrificial bronze insert (like shift levers) where the link bars attach. Don't think fatigue is a concern with current low use of car. IIRC the captured stud is held in place with a wire ring clip in a groove - replicate the OE pocket and reuse the stock ball stud and seats.
 
Back
Top